Showing posts with label Special Technique. Show all posts

Monday, January 27, 2014

January Stamp Club Cards

I finally have a few moments to get a blog post in!  Here are the cards that my club ladies made this month.
For this first card, I used the Watercolor Wonder designer series paper that's in the Celebrate the Everyday catalogue.  The banners are from the upcoming Sale-A-Bration set, Banner Blast, which has a coordinating punch!  I used Gumball Green, Island Indigo, Tangerine Tango, Smoky Slate and Crushed Curry for the colours. 
This next card uses the Painters Tape technique, which I now love!  I CASEd this card from one shown to me by my upline, Winona Semler, which I know that she CASEd from someone else but I don't know who!  I stamped the image from Serene Silhouettes in black StazOn.  Then I put a strip of painters tape into my Crisp Canteloupe ink pad and pressed it down.  After that, I pressed the tape onto the stamped cardstock, pressed it all down, then peeled it off.  The ink stays on the cardstock in a streak!  LOVE IT!  I did the same thing with Soft Sky and Smoky Slate ink.  To finish the card, I stamped some texturing with the Gorgeous Grunge set in Smoky Slate and added some Calypso Coral baker's twine (which goes amazingly well with Canteloupe) before layering the stamped piece onto Soft Sky and Smoky Slate cardstock.
The final card is a Valentine card using the Flowerfull Heart stamp.  I stamped it in Real Red and cut it out with my heart framelits.  I spritzed a paper doily with Coastal Cabana ink (fill a spritzer 3/4 full with rubbing alcohol and add a few drops of re-inker).  It curled nicely with the moisture, and I crinkled it even more to give it some texture.  I layered those onto some Coastal Cabana cardstock with some Fresh Prints designer series paper.  Some Real Red Stitched Grosgrain ribbon finished off the card, which is on a Whisper White base.

Blessings to you,

Wednesday, May 22, 2013

April Stamp Club Cards

I seem to have gotten behind in my posting again!  Two weeks ago, I ended up getting called in to sub for a teacher whose wife had a baby, so he was with her for several days.  Then last week, I ended up subbing three of the four days of school (Friday was a holiday).  So once again, I've fallen behing on my stamping, blogging and house cleaning!  Anyway, these cards are the ones that my Stamp Club ladies made last month.  I'll post May's cards soon!
This first card uses the Moonlighting technique and was designed by my upline, Winona Semler.  Here are the steps:
  1. Stamp your image (from Serene Silhouettes here) in black Staz-On on glossy white cardstock.
  2. Punch a 2-1/2" circle out of a post-it (make sure some of the sticky part is left in the circle).  Place it over the area you want the moon to be.
  3. You will need two shades of blue (Baja Breeze, and Midnight Muse here).  Begin sponging from the masked circle outward in the lightest colour (Baja Breeze).  Sponge the darker colour from the outer edge of the glossy piece inward to meet the lightest colour.  
  4. Take the darker ink and sponge it on the outside edge.  Make sure you blend the colours.
  5. Remove the post-it circle and you will have a beautiful moon!
This card is on a Midnight Muse base with layers of Basic Black and First Edition dsp.  To finish the card, I tied some Midnight Muse stitched satin ribbon around it and added a silver button.
This next card is a little tissue box card.  That's a real kleenex in the box!  My friend, Bea, showed me this card from LeeAnn Greff's blog, and I had to make it!  LeeAnn has a great tutorial on her blog, so I'll just fill you in on the supplies I used.  The designer paper is from the new This & That collection.  I used Confetti White, Pool Party and Basic Gray as accent colours.  The sentiment is from Sassy Salutations, stamped in Pool Party on Confetti White cardstock and punched with the Large Oval punch. This is layered on a Basic Gray Decorative Label punch.  I embossed the Basic Gray piece with the Honeycomb embossing folder.
This final card has a heated ribbon flower, again designed by Winona Semler.  To make this flower, here are the steps:
  1. Cut a circle out of our Jumbo Sticky Rounds using the second smallest circle on the Circles #2 die and the Big Shot.
  2. Cut a 15" piece of ribbon (here, the Pink Pirouette/Rose Red 1-1/4" ribbon).  Snip at every one-inch interval about half-way up.
  3. Starting at the outside edge, begin pinching the ribbon around in a spiral until the complete circle is covered.
  4. Use the heat tool to apply heat all around the ends of the ribbon.  You need to be close, but be careful not to burn the ribbon!  The ribbon will shrivel as you heat it.  Keep going until the desired look is achieved.
To finish the card, I used Pink Pirouette and Basic Gray cardstock.  The greeting is from the Oh Hello stamp set.

Thanks for reading!

Blessings to you,


Sunday, December 9, 2012

December Stamp Club Cards

Alas, it is the last month to do Christmas cards with my club ladies!  Here are the cards we'll be making this month.
This first card was designed by one of the talented ladies in my downline, Christine Burbidge-Boyd.  I tweaked it a little bit because I wanted to use the Dazzling Diamond Dust technique.  The colour scheme is Night of Navy with Whisper White.  I used the Christmas Lodge stamp set here.  The lodge image is stamped, then sponged around the edges. I then covered the whole piece with VersaMark and sprinkled Iridescent Ice embossing powder on it.  After it is heat set, the whole image sparkles!  It's really pretty in real life!
It's difficult to tell from the photo, but this card is a Fun Fold card.  When it's closed, you see the Pacific Point snowflake through the scallop square window.  When you open it up, a sentiment piece slides into the square opening so you can read "Peace on Earth".  I used Pacific Point, Bashful Blue and Perfect Plum with the Snowflake Soiree stamp set.  The scallop square piece is from the Peekaboo Frames die (the center opening square is cut out).  I also used the 1-3/8" square punch to make the openings.  Some Whisper White organdy ribbon and rhinestone jewels finish off the card.
I've shown this card before here, but I haven't done it with my club ladies yet.  It uses the Merry Minis stamp set and punches, along with the ornament paper piercing template.  I LOVE these cute little punched images!
As a bonus project/Christmas gift, my club ladies will get to make this adorable paper ornament.  If you're a Stampin' Up! demonstrator, you've seen these ornaments on the cover of the latest issue of Stampin' Success magazine.  My upline, Winona Semler, came up with this particular one.  It uses First Edition specialty paper with some Cherry Cobbler circles and Vintage Trinkets brads, along with some Early Espresso baker's twine.

Thanks for reading!

Blessings to you,

Friday, November 2, 2012

Layered Snowflakes

I've seen lots of these layered cards, so I wanted to try my hand at it!  My Stamp Club ladies will be making this card this month.
I was inspired by a gorgeous card that my friend, Donna Wizniuk, made.  She used Crumb Cake with Whisper white, which was quite stunning.  I decided to change it up a bit, and I used Midnight Muse and Whisper White with the Snowflake Soiree stamp set.  I embossed the snowflakes in white and also stamped a few in our new Luminescent ink, which makes a shimmery watermark image.    To finish off the card, I used some Midnight Muse stitched satin ribbon and added a "Merry" tag with the Designer Label punch and a couple of pearl jewels.  The snowflakes on the tag are in Midnight Muse, stamped off a few times so they're lighter (ink the stamp, then stamp it on scrap paper a few times before stamping on the sentiment).

Here's a quick tutorial for those of you who haven't seen this type of card before:

1.  Cut three sizes of the same colour of cardstock that you will be stamping your collage image on (Midnight Muse here).  I used 4 x 5 1/4", 3 1/4 x 4 1/2" and 2 1/2 x 2 3/4".  (Often this card is done with white or a neutral colour as these pieces so you can stamp in a coloured ink - I did a reverse here).

2.  Layer the three pieces together on top of each other (you may want to adhere them with Dotto or another repositionable adhesive so they will come apart after).

3.  Stamp your images over the cardstock in a collage style.  Emboss now if you're embossing!
4.  Pull apart the three pieces and layer them onto mats (I used Whisper White).  Make sure you keep the layers in the same direction as when you stamped them so that your images will line up when you put the pieces back together. The card base is the largest mat, then 3 1/2 x 4 3/4" and 2 3/4 x 4" for this card.

5.  Embellish your card as desired.

I love how easy this card is, but it looks complicated!  Enjoy!

Blessings to you,

Friday, September 2, 2011

Christmas Rosette

I'm feeling very Christmas-y and it's only September!  I LOVE, love, love the combination of Real Red and Wild Wasabi that is very trendy this year!
I was inspired to create this card based on a Christmas box project that Stampin' Up! gave to all demonstrators who signed up in July or who had someone sign up with them in July.  I was fortunate to have someone join my team, so I got the box!  It is absolutely gorgeous, and I wanted to make a card to match.

I tried out the Embedded Image technique on the Top Note piece.  I used the First Editions dsp, stamped it with En Francais in Real Red, covered it with VersaMark and embossed it in clear embossing powder.  Then I stamped the branches from Christmas Lodge in VersaMark and embossed them with Wild Wasabi embossing powder.

For the ribbon rosette, I sewed along one edge of the Real Red striped grosgrain ribbon with linen thread and pulled it tight to create the flower.  I attached this to the card with a pop-up glue dot.  The sentiment piece is copied directly from the Christmas box project using the Pines & Poinsettias stamp set. 

I'm going to try not to overdose on Christmas cards before November this year, but I can't help myself!

Blessings to you,

Sunday, August 7, 2011

Elements of Style

I actually a little bit of time to do some stamping "just for fun" this afternoon!  So I just thought I'd play around with my Stampin' Write markers and the Elements of Style set.  I rarely do multi-coloured images on large stamps because it takes so long to colour the image with markers (I'm all about quick and easy!), but I took some time today to colour with Marina Mist and Always Artichoke before stamping it on Whisper White.  I sponged around the edges with Marina Mist and added some Dazzling Diamonds glitter to the flowers.  I layered the stamped piece on some Brushed Silver cardstock and tied some Marina Mist 1/8" ribbon around it.  I then popped a light blue rhinestone out of one of my "Ice" brads and adhered it to the ribbon with a mini glue dot.  And that's it!  Easy-peasy!

Thanks for reading!

Blessings to you,

Monday, August 1, 2011

A CASE for Beautiful Wings

I admit that I totally CASEd this card.  When I saw this stunning creation by Dayanna Donng, I had to try it.  I love the Pink Pirouette with Basic Black - so gorgeous!
The flower from Just Believe and the sentiment from Teeny Tiny Wishes are embossed with black embossing powder, and the butterflies are cut with the Beautiful Wings embosslits die.  Thanks for the beautiful card, Dayanna!

Blessings to you,

Friday, June 10, 2011

June Stamp Club Cards (Part 1)

It's always sad for me when another year of Stamp Club comes to an end.  The ladies in my clubs are so amazing, and we have so much fun!  To wrap things up this month, we'll be making four cards instead of my usual three.
As soon as I saw the tutorial for the Center Step card on Splitcoast, I knew I had to try it!  Here's my version.  I used a lot of retiring products on this card since it's my last chance to use them.  The stamp set is Simply Said, which was one of the first stamp sets I bought after becoming a demonstrator.  I can't believe it's retiring!  Anyway, I used Blueberry Crisp designer series paper and pulled the colours from there (Marina Mist, Not Quite Navy, Very Vanilla, Crumb Cake). 
This next card uses the Poppin' Pastels technique (an oldie, but goodie!).  I haven't done this technique for a long time, but I will be doing it more often now!  It makes for such a soft look.  I stamped the images from Fabulous Florets in VersaMark on Shimmery White cardstock, so there is a shimmer to the finished card.  I used Baja Breeze, Pretty in Pink and Always Artichoke pastels and dabbed them over the stamped images with sponge daubers.  To finish the card, I spritzed it with some Vanilla Shimmer Smooch Spritz to add more shine, then tied some Baja Breeze seam binding around it. 

I'll post the other two Stamp Club cards tomorrow!

Blessings to you,

Thursday, May 12, 2011

May Stamp Club Cards

I meant to post these earlier, but I have had a crazy few months (I'll post more on this later).  I wanted to use some of the products from the new Summer Mini Catalogue this month for my stamp clubs, so here's what we're making.
I am so thrilled that Stampin' Up! has decided to pair with the Breast Cancer Research Foundation with the creation of the Strength & Hope set.  ($2 from the sale of the set goes to the BCRF.)  I wanted to use lots of pink for this card because it ties in with the cause of breast cancer research.

I chose to use the Lap of Luxury designer series paper because there's lots of pink in it!  I added a Pretty in Pink satin ribbon bow as well.  For the background, I stamped the En Francais stamp in Pretty in Pink on some Very Vanilla cardstock.

I stamped the butterfly in Regal Rose ink on some Pretty in Pink cardstock, cut it out, and applied Dazzling Diamonds glitter all over it using my two-way glue pen.  To finish it off, I added a small chain of Rhinestone jewels down the center.
This next card is, of course, very similar to this card that I posted last month!  But this time, I'm using the new Beyond the Garden dsp, and I used the new Blossom Bouquet triple layer punch for the center of the flower.  The flower itself is punched with the large Scallop Circle punch.  I used the Brights textured cardstock for all the parts of the card (Melon Mambo, Pacific Point and Daffodil Delight), along with some Wild Wasabi for the stem and leaf.

The greeting is stamped with Short & Sweet in VersaMark and embossed with Melon Mambo embossing powder (LOVE the new coloured embossing powders!).

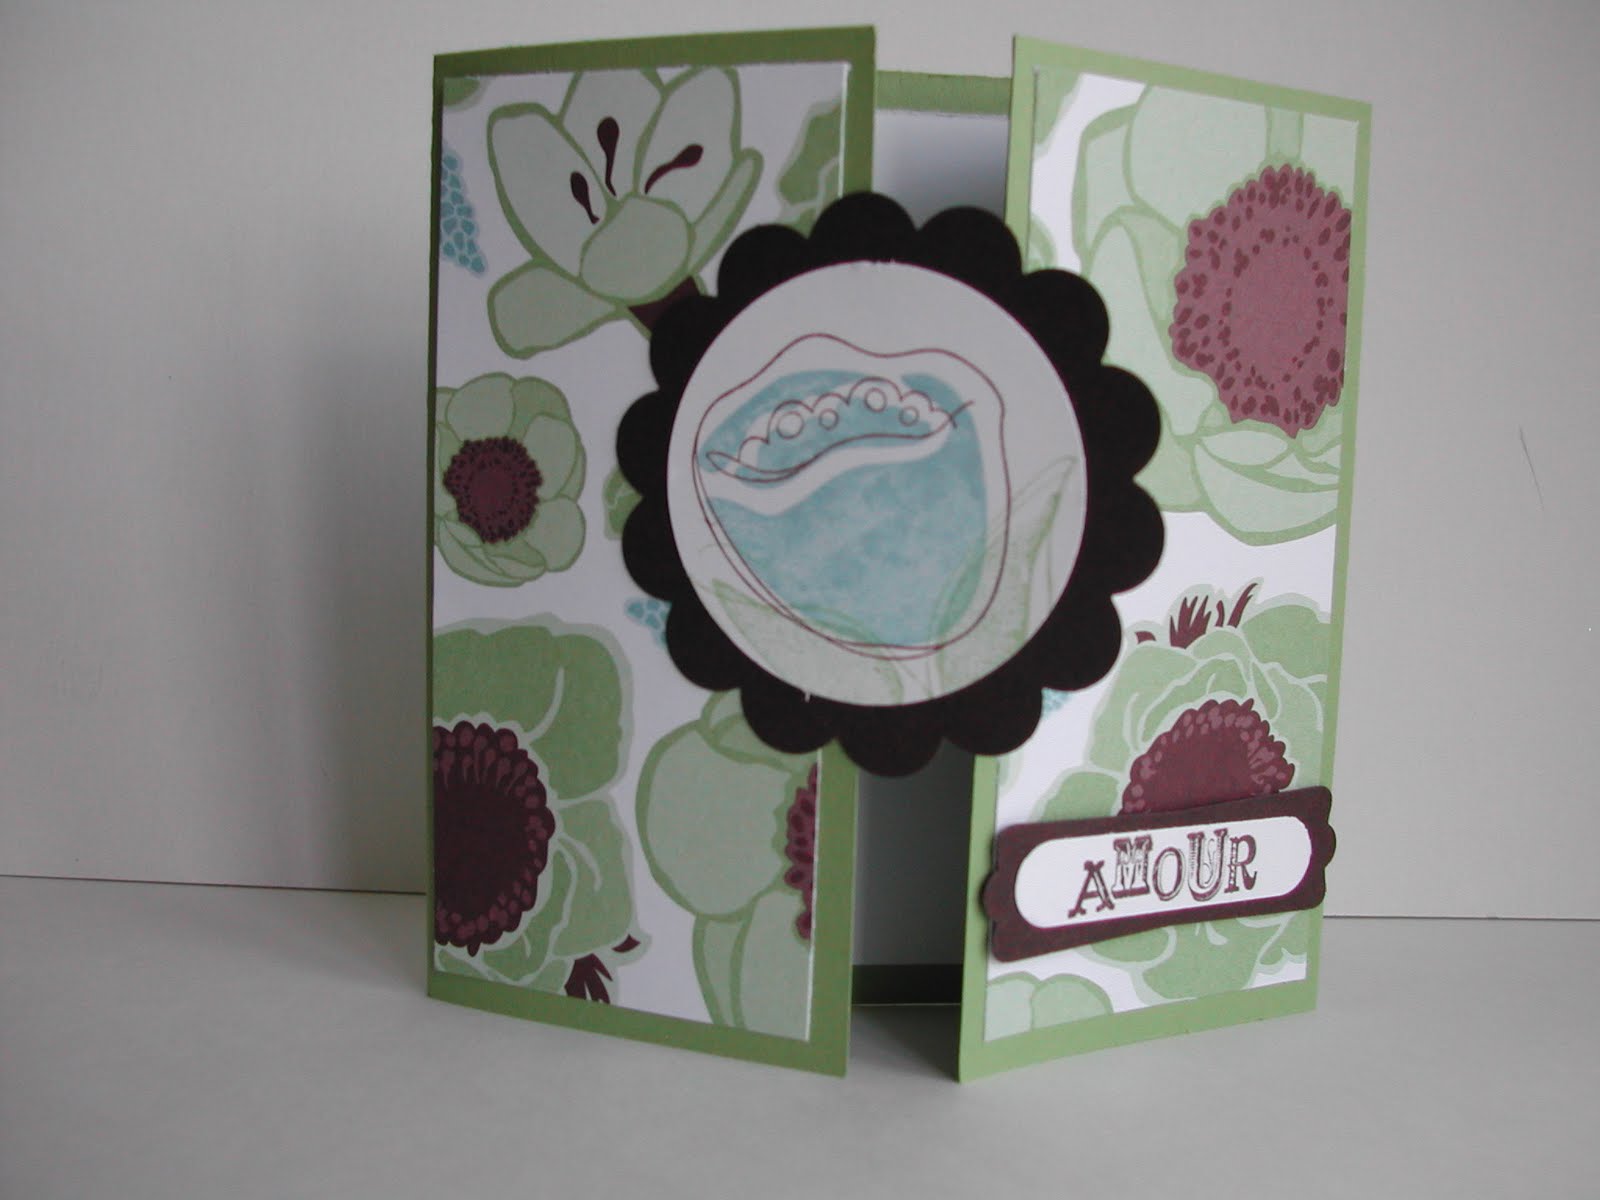
The final card is a CASE of this card by Anne Marie Hile.  I didn't change much because she did such a fantastic job!

I wanted to do some watercolouring with my ladies, so I stamped the boat from Sail Away in black Staz-On ink on some watercolour paper, then used my Aqua Painter to colour it in with my watercolour crayons.

This card also uses the new Binder's Twine in Cherry Cobbler from the Summer Mini, along with some Striped Night of Navy grosgrain ribbon.  The Cherry Cobbler piece at the top of the card is embossed with my Square Lattice embossing folder. 

We only have one more month of clubs left, so I'm sad that we'll be done for the summer.  I have such wonderful ladies in my clubs, so I'm hoping they'll be back in the fall!

Blessings to you,

Sunday, March 20, 2011

Watery Image Stamping

I thought this was a cool technique: water image stamping!  I know I saw this on someone's blog and CASEd the card, but I'm afraid I can't remember where I saw it.  (If you know, please leave me a comment and I'll credit the person!)

All you do for this one is stamp your image first on neutral cardstock.  Then stamp it again on a window sheet or the smooth side of the Stamp-a-Ma-Jig clear sheet.  Cover the image you stamped on the neutral cardstock and press the window sheet onto the other side of the cardstock.

Keep the first image covered while you sponge ink over the mirror image, darker at the middle line of the paper, to look like water.

Here are the supplies I used:
Stamps: Thanks for Caring, Teeny Tiny Wishes

Ink: Bravo Burgundy, Always Artichoke, Marina Mist
Cardstock: Bravo Burgundy, Very Vanilla, Always Artichoke
Accessories: Word Window punch, Stampin' Dimensionals

Thanks for reading!

Blessings to you,

Saturday, February 12, 2011

February Stamp Club Projects

I am very excited about this month's projects!  I learned some really cute techniques and cards at my upline, Winona's, last meeting, and I can't wait to share them.

This first card uses a technique that's popping up all over the place.  We're calling it "Inlaid Embossing", but I've heard it called a few other things!  I CASEd the design from Donna Wizniuk, a talented lady in our downline group.  I started by embossing the card base with the Framed Tulips embossing folder.  Then I put together the center part, layering some Early Espresso, Naturals Ivory, Basic Black, First Edition dsp and an Early Espresso Full Heart. I ran the whole thing through the Big Shot with the Vintage Wallpaper embossing folder.  I finished it off with a pop of colour using a Regals button threaded with linen thread.

Winona showed us how to make this cute present card, so I adapted it to use the Sale-A-Bration designer series paper, ribbon and buttons.  I LOVE the bright colours!  It pops open from the top and there's a card insert inside.  I also used the new Build a Cupcake punch, and I crimped the bottom part of the cupcake. 

The bow on the top is made with the small and large oval punches.  Punch out the small one first, then punch the large oval around the hole left by the small oval punch.  Then arrange them in a "bow" shape!  Too cute!

Those of you who are Stampin' Up! demonstrators will probably recognize the last card from the January issue of Stampin' Success magazine.  I love the builder wheels, and this card is perfect for showing how you can use them for something other than a border.

I embossed the card base with the polka dot embossing folder.  Then I rolled the builder wheels across the Rose Red piece with Chocolate Chip ink and wrapped some Pear Pizzazz twill ribbon around it.  I layered that piece on the Chocolate Chip and Pear Pizzazz cardstock.
 
I've had some requests for learning how to use heat & stick powder, so I added some bling with heat & stick powder and green glitter from the Fine Cosmo glitter pack for the word "wish".

Thanks for reading today!

Blessings to you,

Wednesday, August 4, 2010

August Stamp Club Cards

I am so fortunate to have had lots of ladies sign up for clubs this past year, and one of my clubs is actually going through the summer.  This is our last meeting as this group, and I came up with some special cards for them.
This first card uses the Iris Twist technique.  I used the gorgeous new Woodland Walk designer series paper and pulled my colours from there.  I am so happy that Wild Wasabi is back! It looks so nice with the Chocolate Chip.  The stamp is from the Cute by the Inch level 2 hostess set, which I inked using my Stampin' Write markers.

The second project is the card purse, which is also found on Splitcoast Stampers.  I used the new Celebrations designer series paper and Party This Way stamp set with Pacific Point, Pear Pizzazz, Real Red and Bashful Blue.  For embellishments, I used Certainly Celery satin ribbon and Brights buttons.


As soon as I saw the Smooch Spritz Resist technique on Splitcoast, I had to try it!  I did CASE the sample card by Lydia Fiedler.The card base is Whisper White, embossed with the Vintage Wallpaper embossing folder and the Big Shot.  I cut a scallop circle of Presto Patterns designer series paper and sponged Pacific Point ink all over it.  The I spritzed it with Gold Glow Smooch Spritz and sponged that as well.  To finish the card, I added a Scallop Oval greeting with a clip tied with Whisper White organdy ribbon.

Friday, July 30, 2010

Come to Bethlehem!

I signed up for a Christmas in July swap where we are only supposed to use the new Christmas sets.  I signed up excitedly for two spots, thinking it would be easy.  The trick is that it's a One Layer Card swap!  It sounded simple, but it's much harder than I thought it would be to come up with a nice card that only has one layer (that layer being the card base!).

So for this card, I CASEd this card by Allee.  She used some layers, but I adapted it to be just the card base!

I used masking, brayering and sponging for this card.  I stamped the images from Come to Bethlehem in VersaMark on the Whisper White card, then embossed with silver embossing powder.  Then I tore some scrap paper to have a curved edge and used it to cover the bottom portion of the card.  I then brayered Marina Mist ink across the top portion.  After that, I moved the mask down a bit and sponged some Sahara Sand ink across the top.  I kept moving the paper down and sponging more ink to give a sand dune effect.  Finally, to finish off the card, I tied some Whisper White organdy ribbon around it.

I'm pretty happy with how this card turned out.  Hopefully the ladies in the swap will like it too!

Blessings to you,

Sunday, July 11, 2010

July Stamp Club Cards

I am thrilled to have enough ladies in my Stamp Clubs that we can meet over the summer, although this is the last meeting for my Monday night club. I've had a great year with these ladies!  I'll be showcasing lots of our new catalogue products and colours at this month's clubs.

This first card uses a combination of techniques - I learned it from a very talented lady, Lynne Scratch.  It combines the bouncing brayer and dazzling diamond dust techniques, along with embossing with the Big Shot.

I used the Manhattan Flowers embossing folder to make the flowers in Whisper White, then used two brayers to apply Marina Mist and Elegant Eggplant ink randomly on the flowers.  Then I cut around the edges of the flowers, applied VersaMark to the whole piece and heat embossed it with Iridescent Ice embossing powder. 

To finish off the card, I adhered the flower piece to a Marina Mist (LOVE this colour!) card base, wrapped some Marina Mist 1/8" Taffeta ribbon around it and added a sentiment.

This second card is one I made for my sister-in-law, Wendy's, workshop this afternoon, but I thought it would be a great Stamp Club card because it uses all the new In Colors!

I used the new Level 1 hostess set Because I Care with my In Color Stampin' Write markers.  I coloured the different colours on the flower part of the stamp and Pear Pizzazz on the stem and leaf before stamping on Whisper White.  I then sprayed this piece with Vanilla Shimmer Smooch Spritz to give it a soft, shimmery look.

To finish off, I matted the flower piece on some Pear Pizzazz and Concord Crush cardstock, wrapped some Certainly Celery 5/8" grosgrain around it and adhered it to the Blushing Bride card base.  The sentiment is stamped in Blushing Bride and Concord Crush.

The final card is a Gate Fold card that I made using the new Greenhouse Gala designer series paper.  I pulled the colours from the paper - Pear Pizzazz, Baja Breeze, Early Espresso.  The stamp set is Awash With Flowers.
I'm looking forward to tomorrow and Tuesday night Stamp Clubs!  Thanks for reading!

Blessings to you,

Friday, May 7, 2010

May Stamp Club Cards

Yay! I managed to get my Stamp Club cards planned!  I apologize for the quality of the photos.  I can't get decent light in my apartment! 

I wanted to showcase a lot of the new products from the Summer Mini Catalogue, so here's what we'll be making this month.
I CASEd this card by Nancy Littrell.  I've been wanting to do watercolouring with my clubs for quite some time, and when I saw this Elements of Style set in the mini catalogue, I knew it was perfect!  I first cut some watercolour paper with the Top Note Bigz die, then stamped the flower image in black Staz-On on it.  I used the Rich Regals watercolour crayons and my aquapainter to colour in the flowers.  I then spritzed the image with Vanilla Smooch Spritz.  LOVE this stuff!  To finish off the card, I added some Basic Black satin ribbon and matted the coloured piece on Ballet Blue cardstock.
 This second card uses the new Builder Wheels!  These are so cool!  I inked the triple cell cartridge with Pretty in Pink, Tempting Turquoise and Certainly Celery ink and rolled the wheel across.  I thought the Sweet Scoops stamp set went really well with these wheels as well, so I added a scoop of Pretty in Pink and some Tempting Turquoise sprinkles.
 This final project is something I learned at our WeCanStamp group meeting last month.  I thought it was so cute!  I ran a 3 x 3 envelope through the Big Shot with the new Square Lattice embossing folder (make sure the envelope flap is open).  Then I punched a scallop circle out of the envelope (through both sides).  I cut a 2 3/4" square of Pixie Pink cardstock and I put it in a small cellophane bag that I cut the top off of so it was three inches long.  This whole thing fits in the envelope.  I stamped the "for you" sentiment from the Elements of Style set in white Staz-On on the cello bag.  And because it's a small envelope, the Itty Bitty Bits stamp set, Bitty Buttons and Punch Pack all work perfectly with it!  I layered those as an accent, then stamped the sentiment from Teeny Tiny Wishes in Lovely Lilac.

There are so many more Summer Mini products I wanted to use, but I guess they'll have to wait until next month!

Blessings to you,

Wednesday, March 17, 2010

March Scrapbook Club Layout

This month, my Scrapbook Club will be doing a layout based on this card that my Stamp Club made this month (scroll down to the second card on the post).  I LOVE the Vintage Vogue stamp set and jumbo wheel.  They are so versatile!
The pages are Very Vanilla 12 x 12.  I rolled the Very Vintage jumbo wheel across them in Old Olive ink.  Then I randomly stamped images from Vintage Vogue all over the pages in Perfect Plum.  For the first page, I stamped the Medallion in VersaMark and embossed it with clear embossing powder.  Then I sponged Perfect Plum ink around it (Emerging Colour Technique).  I also sponged Plum ink around the edges of the pages to soften them.

For embellishments, I added some cut-out stamped flowers from the Vintage Vogue set.  A couple of them have half pearls from the Pretties kit.  I also added a clip with some Old Olive ribbon.

Blessings to you,