Showing posts with label Big Shot. Show all posts

Saturday, June 29, 2013

"He is Mighty to Save" Frame

I've been meaning to post this photo for awhile.  This is a project I created for our church's Ladies Retreat weekend.  They wanted a quick, easy craft that costs less than $5, so here's what I came up with!
I made the Bible verse, which was the theme verse for the weekend, on My Digital Studio.  I then printed it out on Very Vanilla cardstock and cut it out to fit a 5 x 7 frame (which I found at the dollar store).  For the quilted piece, I cut a large square of Soft Suede cardstock and one of Summer Starfruit to fit inside it.  Then I punched out a bunch of 1 1/4" squares of the now-retired Comfort Cafe designer series paper and glued them onto the large squares.  I then ran the whole thing through the Big Shot with the Lacy Brocade embossing folder.  To finish it off, I tied some lace ribbon around it and glued it to the Vanilla Bible verse piece before popping the whole thing into the frame.  Quick and simple, yet a gorgeous reminder of their retreat weekend.

Thanks for reading!

Blessings to you,

Monday, June 24, 2013

June Stamp Club Cards

Here are the cards my Stamp Club ladies made this month.  The focus was on new catalogue products.
This first card features the Mosaic Madness product suite, including the stamp set, designer series paper and embossing folder.  The greeting is from the Petite Pairs stamp set, which is on sale this month for 25% off!
  
We also added a flower using our new clay molds and Simply Pressed clay.  It's sprayed with Pool Party ink mixed with rubbing alcohol using our spritzers.
The next card features our Wildflower Meadow stamp and embossing folder.  We coloured the stamp using Old Olive, Rose Red and Daffodil Delight Stampin' Write markers before stamping, then embossing it.  The card is finished with some Gingham Garden Washi Tape.
Our final card doesn't actually feature new products, but it includes a greeting from the Sassy Salutations stamp set, which is on sale this month for 25% off!  My mother-in-law, Margo, made a similar card for my son for his birthday, and it was so cute, I had to CASE it (I know she also CASEd it from someone else, but I'm not sure who, so I'm sorry I can't give credit to its creator!).  The cute little monsters are made using the Owl punch.  The arms are the same punch, just the feet of the owl cut straight down to give long arms (if that makes sense!). 

Blessings to you,

Friday, December 21, 2012

Some Non-Christmas Cards!

I know Christmas is only four days away, but I am honestly a little bit tired of making Christmas cards!  I started making them in August, so I'm feeling ready for something else! Luckily, my friend, Kennie, booked a stamp-a-stack last week where we made different occasions cards.  She wanted to make some cards to give as Christmas gifts so people would have an assortment to use throughout the year.  Here are the cards we made:
I love the bright colours in the Summer Smooches designer series paper!  This card screams "Happy Birthday" with Daffodil Delight, Rich Razzleberry, Island Indigo and Lucky Limeade!  The images are from Bright Blossoms, and the sentiment is from Sassy Salutations.  Some Daffodil Delight stitched grosgrain ribbon finishes off the card.
Okay, I admit the colours in this one are a bit Christmas-y, but I love Gumball Green and Raspberry Ripple!  The Gumball Green piece is embossed with the Lacy Brocade embossing folder.  The image from Fabulous Florets is stamped in Raspberry Ripple, and the greeting is from Word Play.  We also added some Raspberry Ripple stitched satin ribbon.
I've had the Apothecary Art stamp set for awhile, and I think this is the first time I've used it!  It's so beautiful!  I used Wisteria Wonder and Basic Gray as the base colours, along with some Pretty in Pink polka-sot scalloped ribbon.  The image is stamped in Basic Gray, and we used blender pens with Pretty in Pink and Wisteria Wonder ink to colour in the flowers.  Of course, the Labels Collection framelits dies coordinate perfectly with the stamp set, so I had to use those!
This is our masculine birthday card.  I used Early Espresso as the card base, along with a layer of Very Vanilla cardstock.  The 1" circles are punched from the Orchard Harvest designer series paper.  The sentiment from Petite Pairs is stamped in Early Espresso on some Cajun Craze cardstock and punched with the Decorative Label punch.  At the stamp-a-stack, I also had out the Four Frames stamp set, so the ladies could stamp that on the label piece before stamping the sentiment.  It looks a lot better with the frame border!

I hope you enjoy these non-Christmas cards!  If I don't get a chance to post before then, Merry Christmas to all of you, and all God's blessings for a safe and prosperous New Year!

Blessings to you,

Sunday, December 9, 2012

December Stamp Club Cards

Alas, it is the last month to do Christmas cards with my club ladies!  Here are the cards we'll be making this month.
This first card was designed by one of the talented ladies in my downline, Christine Burbidge-Boyd.  I tweaked it a little bit because I wanted to use the Dazzling Diamond Dust technique.  The colour scheme is Night of Navy with Whisper White.  I used the Christmas Lodge stamp set here.  The lodge image is stamped, then sponged around the edges. I then covered the whole piece with VersaMark and sprinkled Iridescent Ice embossing powder on it.  After it is heat set, the whole image sparkles!  It's really pretty in real life!
It's difficult to tell from the photo, but this card is a Fun Fold card.  When it's closed, you see the Pacific Point snowflake through the scallop square window.  When you open it up, a sentiment piece slides into the square opening so you can read "Peace on Earth".  I used Pacific Point, Bashful Blue and Perfect Plum with the Snowflake Soiree stamp set.  The scallop square piece is from the Peekaboo Frames die (the center opening square is cut out).  I also used the 1-3/8" square punch to make the openings.  Some Whisper White organdy ribbon and rhinestone jewels finish off the card.
I've shown this card before here, but I haven't done it with my club ladies yet.  It uses the Merry Minis stamp set and punches, along with the ornament paper piercing template.  I LOVE these cute little punched images!
As a bonus project/Christmas gift, my club ladies will get to make this adorable paper ornament.  If you're a Stampin' Up! demonstrator, you've seen these ornaments on the cover of the latest issue of Stampin' Success magazine.  My upline, Winona Semler, came up with this particular one.  It uses First Edition specialty paper with some Cherry Cobbler circles and Vintage Trinkets brads, along with some Early Espresso baker's twine.

Thanks for reading!

Blessings to you,

Friday, September 7, 2012

Evergreen Glimmer

I love the new Evergreen stamp set in the Holiday catalogue.  I recently saw this card by Heather Cooper, and I fell in love with it, so I had to CASE it.   
The card base is Cherry Cobbler.  I stamped the Woodgrain background on some Very Vanilla cardstock in Soft Suede ink, then swiped the ink pad over the edges of the vanilla paper.  I used the Labels Framelits with the Big Shot for the Always Artichoke, Champagne Glimmer and Very Vanilla layers.  The tree is stamped in Always Artichoke, then I embossed the words over the tree with gold embossing powder.  Finally, there are some dots of Cherry Cobbler dazzling details over the tree with a rhinestone jewel at the top.  Some Cherry Cobbler seam binding finishes off the card. 

Thanks for stopping by!

Blessings,

Tuesday, April 3, 2012

April Stamp Club Projects

Of course, I'll be using the Summer Smooches product suite with my Stamp Clubs as well!  I love all the colours - they make me happy! :)
This card is a modified Joy Fold card using the large scallop circle die with the Big Shot and my Circle Scissors Plus circle cutter.
I've been wanting to use the maze game pieces from the Occasions Mini Catalogue for a long time, and this is my last month to use them!  I started out thinking I would make a kids' card, but then I thought adults would enjoy the maze game too (I know I spent a lot of time playing with it!).  So here is my "adult" maze game card.  I used Twitterpated designer series paper with Riding Hood Red and Basic Black accents.
My evening club will be making this bird house using the Milk Carton die and the Big Shot.
My morning Stamp Club ladies don't like 3-D projects, so they will be making this card using the Labels Framelits dies and the Big Shot.
Thanks for reading!

Blessings to you,

Monday, February 6, 2012

Coral Valentine

I love the Sweet Shop designer series paper in the Occasions Mini Catalogue, especially the Calypso Coral paper with the embossed hearts on it!
As such, I came up with this non-traditionally-coloured Valentine to incorporate that gorgeous paper!  I used Chocolate Chip as my card base, layered with some Calypso Coral that is tied with some Chocolate Chip polka-dot ribbon.  I stamped En Francais in Chocolate Chip on Whisper White, then cut it out with the Labels Framelits dies. I adhered the smaller label to the Coral paper, then added the frame around it popped up on dimensionals. 

To complete the card, I added some hearts - the paper that inspired the card, plus one stamped with a stamp from Take it To Heart in Chocolate Chip, and finally a little "love" heart, all cut with my Heart Framelits.  The sentiment is from Sweet Cake.

Happy Early Valentine's Day!

Tuesday, January 3, 2012

January Stamp Club Cards

Happy New Year!  I've had so much fun playing with all the new stuff from the Occasions Mini Catalogue, and my Stamp Club ladies get to share in the fun!  Here's what we'll be making this month:
This is my sneak peek card for the upcoming Sale-A-Bration!  I copied the butterfly idea out of the mini catalogue.  It uses the new lace doily sizzlits die in Calypso Coral, layered over some Everyday Enchantment designer series paper, then cut with the Beautiful Butterflies die.  I also used one of the new Edgelets dies and embossing folders for the bottom of the card.  The sentiment is from Elementary Elegance, stamped in Lucky Limeade.  Some SAB ribbon and a brad finish off the card.
I definitely wanted to show off the new Framelits dies, so I used them with the Take it to Heart stamp set.  I stamped the bird in black Staz-On on watercolour paper, then coloured using my Stampin' Pastels and a blender pen.  I also used my Aqua Painter with some Baja Breeze ink to colour in the heart so it would blend better with the Twitterpated designer series paper.  I punched a scallop circle out of Blushing Bride, then used my bone folder to soften the paper (swipe the bone folder over the cardstock several times until the edges start to come apart).  Then I peeled apart the scallop circle so I had two that look like suede.  I glued those together, then did the same thing with some Island Indigo paper and my Boho Blossoms punch.  To finish off the card, I added some Blushing Bride folded satin ribbon and a Twitterpated button from the new mini catalogue. 
I couldn't go without the new scented embossing powders, so I had to show this to my Stamp Club ladies!  The cherries from the Mouthwatering set are inked with Real Red craft ink and a Lucky Limeade Stampin' Write marker.  I then poured some Cherry-scented embossing powder over the cherries and heat set them.  They smell soooooo good!  The card is simply finished with some polka-dot embossed Lucky Limeade cardstock and Real Red satin ribbon.

Thanks for stopping by!

Blessings to you,

Thursday, August 4, 2011

Simple Silhouettes

My friend asked me to make some simple birthday cards for her, so here's what I came up with.
It's been a long time since I've used my Pocket Silhouettes stamp set, so I dug it out for this simple black & white card.

Just a quick post today!  Hope everyone is having a great summer!  Ours is going way too fast...

Thanks for stopping by!

Blessings to you,

Wednesday, July 13, 2011

In Color Blossom Bouquet

This is a little something I came up with to showcase all the new In Colors (Calypso Coral, Island Indigo, Lucky Limeade, Pool Party, Wisteria Wonder).  I used the Blossom Bouquet Triple Layer punch to make all the flowers, then layered them on some Sahara Sand that I embossed with the Finial Press embossing folder.  The card base is Whisper White.  I finished off the flowers with some rhinestone jewels.  Quick & simple!

Blessings to you,

Monday, July 11, 2011

New Catalogue Open House!

I'm so excited to be hosting my annual New Catalogue Open House and Retired Product Garage Sale on Thursday!  Of course, there will be make & takes!
This first card shows off the new In Colors (aren't they gorgeous?).  I punched a square of each colour with the Postage Stamp punch, then adhered them onto a Sahara Sand background.  I ran the whole thing through the Big Shot with the Finial Press embossing folder, then layered it on some Island Indigo cardstock.  I then stamped a greeting from the new Pennant Parade stamp set in Island Indigo on Whisper White cardstock and punched it out with the Postage Stamp punch as well before adhering it to the card with some dimensionals.  The whole piece is then attached to the Whisper White card base.
This second card showcases our new punches!  How cute is that ice cream cone?  I've seen a few of these, so I had to try it myself.  The cone is Crumb Cake cardstock embossed with the Square Lattice embossing folder then punched with the new Petite Pennants Builder punch.  The "ice cream scoops" are made with the Cupcake punch in Chocolate Chip, Very Vanilla and Pretty in Pink.  I layered the ice cream cone on some Pink Pirouette and Chocolate Chip cardstock before adhering it to a Very Vanilla card base.  Then I added a Chocolate Chop ribbon border punched piece across the bottom before stamping the greeting from Short & Sweet.

If you live in my area, please feel free to stop by between 4:00 & 8:00 on Thursday to check out the new catalogue, do some make & takes, eat and shop!

Blessings to you,

Thursday, April 7, 2011

April Stamp Club Cards

I have been challenged to come up with more masculine cards this month, as I usually do girly, flowery cards!  (And who can resist with the Springtime Vintage suite?!)  So, I hope these are more masculine fare (except for the Easter card).
Okay, this one has a flower, but the colours are more masculine and neutral!  This card was created by Lorna Raczynski, a talented demonstrator in our big WeCanStamp group.  I love all the texture in this card.  It uses Elegant Soiree designer series paper, Chocolate Chip and Very Vanilla cardstock and Crumb Cake seam binding.  The flower is made from a wood sheet, punched with the Fun Flowers die, then embossed with the Elegant Lines embossing folder in the Big Shot.  I then sponged Chocolate Chip ink over it.  The sentiment is from Curly Cute, stamped in Chocolate Chip ink. To finish it off, there is a 1" Chocolate Chip circle covered with a Neutrals Collection button and some Very Vanilla 3/8" taffeta ribbon.
As soon as I saw this bunny on Christy Fulk's Easter basket, I knew I had to use him on a card!  How cute is he?  She gives a tutorial on how to make him at the above link (except I used Blushing Bride for the ears and nose instead of Pretty in Pink because it matched the designer paper better).

For the rest of the card, I used Whisper White, embossed with the Tulip Border embossing folder.  I added some gorgeous Paisley Petals designer series paper and stamped the image from Four Frames (both of which are a sneak peek from the new 2011 - 2012 Idea Book & Catalogue, on special this month). I wrapped some Whisper White Organza ribbon around the designer paper and punched the image with the Designer Label punch.  The greeting is from Something to Celebrate (level 2 hostess set in the Occasions Mini Catalogue, which can be yours if you host a workshop in April!).

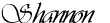
The final card is another CASE, from the Occasions Mini catalogue.  I wanted to use the Game Spinner Hands for a Stamp Club project, and this is a cute masculine kids' card.  The base is Not Quite Navy, layered with some So Saffron Patterns designer series paper from the Subtles Paper Stack.  I punched the scallop circle out of Rich Razzleberry with the Scallop Circle #2 Big Shot die.  The image is from Take a Spin, stamped in Pear Pizzazz with Rich Razzleberry accents (I used my Stampin' Write marker for the accents, colouring directly on the stamp after I inked it with Pear Pizzazz).  The image was punched out with the fantastic new 2 1/2" Circle punch.  Some Pear Pizzazz ribbon finishes it off, along with a sentiment from On Your Birthday in Not Quite Navy.

I made this card 4 1/4 x 4 1/4" so the scallop circle could be above the top of the card and still fit into a standard envelope.

I'm very excited for Stamp Clubs this month!

Blessings to you,

Friday, March 18, 2011

Fun With My Fun Flowers Die!

I haven't bought a lot of dies for my Big Shot.  I have tons of embossing folders, sizzlits, embosslits, etc., but I'm a bit frugal when it comes to spending a lot of money for a die.  But I did fall in love with the Fun Flowers die when I saw it in the mini catalogue!
I decided that I want to make quick, easy thank you cards to put in with my customers' orders.  And this die is perfect for that!  I can make 16 flowers with eight sheets of cardstock (I used Perfect Plum, Marina Mist, Wild Wasabi and Rose Red).  The card base is So Saffron, embossed with the Perfect Polka Dots embossing folder.  I put the flowers together with Brights glimmer brads (I would have used Subtles, but I don't have those yet!).  It took me about 20 minutes to make all these cards!
I can't wait to make more fun cards with this die.  And I think it will be perfect for some spring scrapbook layouts...

Thanks for stopping by!

Blessings to you,

Tuesday, March 8, 2011

March Stamp Club Cards

I've got Spring Fever!  Even though it's still cold and snowy here, I've been itching to get out my spring stamps and colours and make some floral cards.  So we're having a spring theme this month!
I've been wanting to make a clear envelope brag book with this group for awhile, and I love the way the Springtime Vintage designer series paper looks for a little memory book.  I used the Baja Breeze dsp, cardstock and seam binding for this card, along with the Baby Blossoms and Define Your Life stamp sets.

This next card uses a cool technique I learned at one of my upline, Winona's, meetings.  I used my embosslits die to cut out the flower in Melon Mambo and Daffodil Delight, then cut window sheets with the embosslits as well.  I attached a window sheet flower over each coloured flower with a Brights brad.  It makes a really fun, bright flower!  I finished off the card with some of the Sale-A-Bration Ice Cream Parlor designer series paper, some Polka Dot embossed Whisper White cardstock and Old Olive 5/8" grosgrain ribbon, all layered on an Old Olive card.  The sentiment is from the Sale-A-Bration set So Happy For You, stamped in Old Olive as well.

I also thought it would be fun to make a waterfall card, and this one is a simple kid's birthday card.  I used a couple of stamp sets: Look Who's Turning and Animal Stories.  I used some fun kids colours from the Subtles colour collection: Perfect Plum, Marina Mist, So Saffron, Wild Wasabi and Rose Red.  For the card and designer series paper (from the Subtles Paper Stack), my club will have a choice of colours from the five listed above.  I also added some Subtles brads to hold the slider part in place.

Should be lots of fun!

Blessings to you,

Saturday, February 12, 2011

February Stamp Club Projects

I am very excited about this month's projects!  I learned some really cute techniques and cards at my upline, Winona's, last meeting, and I can't wait to share them.

This first card uses a technique that's popping up all over the place.  We're calling it "Inlaid Embossing", but I've heard it called a few other things!  I CASEd the design from Donna Wizniuk, a talented lady in our downline group.  I started by embossing the card base with the Framed Tulips embossing folder.  Then I put together the center part, layering some Early Espresso, Naturals Ivory, Basic Black, First Edition dsp and an Early Espresso Full Heart. I ran the whole thing through the Big Shot with the Vintage Wallpaper embossing folder.  I finished it off with a pop of colour using a Regals button threaded with linen thread.

Winona showed us how to make this cute present card, so I adapted it to use the Sale-A-Bration designer series paper, ribbon and buttons.  I LOVE the bright colours!  It pops open from the top and there's a card insert inside.  I also used the new Build a Cupcake punch, and I crimped the bottom part of the cupcake. 

The bow on the top is made with the small and large oval punches.  Punch out the small one first, then punch the large oval around the hole left by the small oval punch.  Then arrange them in a "bow" shape!  Too cute!

Those of you who are Stampin' Up! demonstrators will probably recognize the last card from the January issue of Stampin' Success magazine.  I love the builder wheels, and this card is perfect for showing how you can use them for something other than a border.

I embossed the card base with the polka dot embossing folder.  Then I rolled the builder wheels across the Rose Red piece with Chocolate Chip ink and wrapped some Pear Pizzazz twill ribbon around it.  I layered that piece on the Chocolate Chip and Pear Pizzazz cardstock.
 
I've had some requests for learning how to use heat & stick powder, so I added some bling with heat & stick powder and green glitter from the Fine Cosmo glitter pack for the word "wish".

Thanks for reading today!

Blessings to you,