Friday, February 29, 2008

A Wonderful Birthday & A Blog Candy Winner!

What a wonderful birthday I had yesterday - probably one of my best ever! First, on Wednesday, I had a delivery of beautiful flowers from my mom.

Then yesterday, I went out for a bit in the morning, and when I returned, this beautiful drawing was in my mailbox. My SIL, Twyla, drew this for me. I had tears in my eyes when I saw that it's a picture of my dad (who passed away ten years ago) that she drew with my boys. He never got to meet them, but he would have been a wonderful grandpa! I can't believe how much my boys look like him. What a beautiful gift! Thank you, Twyla.

Then my friend, Sherri, showed up with lunch for me at noon (always a treat not to have to make lunch!). We had a great visit. She's such a thoughtful friend.

Later, my other SIL, Wendy, showed up with a vase of lilies for me. Take a look at the vase! Those are SU! Rub-Ons!!! A woman after my own heart. LOL.

My boys slept most of the afternoon, so I had some quiet time to myself. Then, when my husband got home from work, he and my boys took me out for supper. Again - nice not to have to cook! I spent the evening with my son at AWANA, then came home and watched Survivor and Celebrity Apprentice!

All in all, a wonderful birthday!

So anyway, you're probably wondering who won the Birthday Blog candy! I have enjoyed reading about your favourite birthday memories. Thank you all for visiting and commenting.

So without further ado, the winner (as selected by Random.org) is...
#26 - bluemoon

Here is her comment:
Best Wishes for a very Happy Birthday to you! and Happy 20K too! Lots to smile about

Here's a good b-day memory, I was a kid, up at our cottage on the lake, no tv etc. On my birthday my dad said he had a special present for me, and took me over to the neighbours cottage. there they were all eyes on the very tiny black and white... my dad told me he arranged this was especially on my birthday... we all saw the men landing on the moon for the first time on my birthday! As a kid, I did not know any better LOL. :) Happy Day.

What an amazing birthday memory - the first moon landing! Wow! Thanks for sharing that! Please email me with your mailing address so I can send your blog candy to you.

Thanks for playing and thank you for your birthday wishes. Have a great weekend!

Thursday, February 28, 2008

Birthday Blog Candy Time!

I'll leave this post at the top until the winner is chosen. Please scroll down for new posts.

Well, I just noticed that my counter just passed 20 000 hits! I'm amazed. When I started this blog during the summer, I really didn't expect that anyone outside of my family would ever even look at it, and now I'm so privileged to have made so many wonderful blog friends all over the world. How cool is technology! And in addition to the 20 000 hits, it's also my birthday on Thursday.

So to celebrate my birthday and all the hits, I am going to offer some super-amazing blog candy.
ETA: The blog candy will be this In Full Bloom Simply Scrappin' Kit (it's opened, but nothing has been used - I just wanted to take a peek!), two sheets of Accents & Elements stickers, a clear envelope brag book that I made, a dragonfly stamp, a "Be Happy" incentive stamp, a black stampin' spot and some chipboard tags. I hope you'll like it!


For a chance to win this blog candy, all you have to do is leave me a comment on this post and tell me what your favourite birthday memory is. I will leave this open until 11:59 p.m. (mountain time) on Thursday, February 28 (my birthday!) and choose a winner on February 29 using Random.org.

Thanks for playing and thanks for visiting!

Wednesday, February 27, 2008

Spring Has Sprung!

Thank you to all of you who have commented on my birthday blog candy. Remember you have until midnight tonight to get a comment on this post. As an aside, can someone please tell me how to respond to a comment by email? I would like to respond to some people, but I cannot figure out how to email them and include their comment! I would really appreciate any help!! Thanks in advance.
Here are a couple of Easter/Spring cards. I was asked by one of my friends to come into her work place during a lunch hour so she and her co-workers could make a couple of cards for Easter (though some wanted Spring cards instead). So I admit that I totally CASEd these cards from the Splitcoast gallery. I wanted to use Never-Ending Joy, but I just couldn't come up with something on my own!

For this card, I CASEd this one by Gabby89, but I switched the paper to the Bashful Blue Prints designer series paper (from the Level 1 hostess gifts) and Bashful Blue, Perfect Plum and Regal Rose cardstock. The tulip is from Garden Whimsy, and I added some Pretty in Pink grosgrain ribbon behind the images. The flower stem is stamped in Wild Wasabi.


For this card, I CASEd this one by momtocnjn, but I used Never-Ending Joy instead. I kept the Certainly Celery and added Barely Banana, and I switched the ribbon to Pretty in Pink. And instead of designer paper, I just used my Itty Bitty Backgrounds with Barely Banana ink (on Barely Banana cardstock) for some texture. I always forget I have those stamps, but they just add that extra something!

Thanks for stopping by! I hope you like these.

Tuesday, February 26, 2008

March Stamp Club Cards

Thank you all for your encouragement about my Scrapbook Club, which met last night. I think everyone had a good time, and they seemed to like the layout (see this post)! One lady scrapbooked her sister's five-year cancer-free celebration, and their theme was pink, so that worked perfectly for the layout and supplies I gave them! For a few of the ladies, this was their first time scrapbooking, and all their pages turned out beautiful! It was really a fun night.

For my March Stamp Clubs, I wanted to do some "spring-y" cards and showcase some different techniques and projects.
I was inspired by Corie to do a Criss Cross card, although I will concede that she is the queen! I started with Berry Bliss designer paper (my new favourite!) and used Close to Cocoa and Pretty in Pink as accent colours.
For this card, I used the VersaMark resist technique, which is one I've wanted to show for awhile. I can't decide if I like the card or not! It's pretty green - but I think it works nicely for St. Patrick's Day (at least that's my story!). Does anyone give out St. Patrick's Day cards? Anyway, I used Wild Wasabi and Certainly Celery for this one, along with the Baroque Motifs stamp set.
This final card has appeared on my blog before, but we'll be making it at Stamp Club, so I had to post it again.

I used the Bloomin' Beautiful set from the Occasions mini catalogue, along with French Script as a background. The colours are Soft Sky, Blue Bayou and Whisper White. I used my aquapainters to watercolour in the flowers with Blue Bayou, Mellow Moss and Sahara Sand for the vase. The flower ribbon tie is from the Styled Silver hodgepodge hardware (also in the Occasions mini), threaded with Whisper White grosgrain. I finished it off with a couple of silver brads.

Thanks for reading, and don't forget to enter my blog candy draw here!

Monday, February 25, 2008

February Scrapbook Club Layout

My Scrapbooking Club is meeting tonight. This is the first layout we'll be doing, so I really hope the ladies like it. This was more challenging than I thought! Usually when I scrapbook, I start with my photos and choose a layout and colours from there. So it was difficult for me to come up with a layout without pictures! I decided to do a Valentine's/Love theme since it's February. (I told the ladies ahead of time what colours we would be using so that they could bring appropriate photos.) For this layout, I used the Berry Bliss designer paper as my starting point. The base of the pages is Pretty in Pink. I used Close to Cocoa and Purely Pomegranate as accent colours.

I have a mix of experience with this group. Some ladies have never scrapbooked before and some are seasoned pros, so I tried to come up with something interesting that was easy enough for beginners (quite a challenge!). That's why I used squares and rectangles! I also left space on the page for journaling.

The ladies are free to copy my layout if they'd like or they can just take the supplies and make whatever layout they'd like. Of course, I'll have my tools, stamps and ink on-hand for them to use. This is my first Scrapbook Club, so I'm anxious to see how everything goes! Wish me luck!

Thanks for reading, and have a happy Monday!

Thursday, February 21, 2008

Perfect Bra and Jeans

This isn't really craft-related, but I thought it was cool, so I'll share! My SIL forwarded this site to me called Zafu where you answer a few questions and it finds the perfect bra and jeans to suit your size/body type/style. It's fantastic! I'm forever lamenting that I can never find jeans that fit me properly and I hate trying on hundreds of bras to find one I like. This narrows it down a lot. Now I need to go shopping and see if they're right! Check it out and let me know if it helps!

Tuesday, February 19, 2008

Super-Easy Brag Books!

When I saw the tutorial for these Clear Envelope Brag Books on Splitcoast Stampers a few weeks ago, I knew I had to make some! They are so much fun to make and so easy! I'm going to use them as hostess gifts for my upcoming workshops.


Cyber Stamping Sisters in Christ!

I came across this badge on Diane's blog (Diane's Designs). It was designed by Dini for those of us who know Christ as our Saviour and who enjoy stamping and blogging (I know there are a lot of us out there!). If you'd like the html code to add the badge to your own blog, just click on the badge on my sidebar and it will direct you to Dini's site.

One of my favourite verses has always been Romans 8:38 - 39:
"For I am convinced that neither death nor life, neither angels nor demons, neither the present nor the future, nor any powers, neither height nor depth, nor anything else in all creation, will be able to separate us from the love of God that is in Christ Jesus our Lord."

What a powerful love God has for us. And "God demonstrates His own love for us in this: While we were still sinners, Christ died for us." (Romans 5:8)

Monday, February 18, 2008

Beate's Weekend Sketch Challenge #35

Wow! It has been a long time since I've done a sketch challenge. Since it's a long weekend here in Alberta (Family Day weekend, thanks to past premier Don Getty in case you're interested!), I actually had some time to play! I decided to do Beate's WSC35 - I haven't had a chance to do one since she started doing them again. I always love her sketches, and this one was lots of fun. I came up with a couple of cards for it.

So I cracked out some of my new goodies for this first card. The image is from Bloomin' Beautiful (from the Occasions mini catalogue that begins in March). As soon as I saw it, I knew I had to have this set! I stamped it in Basic Black, then coloured it in with my Aquapainter and some Blue Bayou ink. The leaves are Mellow Moss and the vase is Sahara Sand.

I used Soft Sky as my base, stamped with French Script in Blue Bayou. Then I layered on the Blue Bayou and Soft Sky paper. To finish it off, I put a couple of silver brads on it and a buckle from the new Styled Silver Hodgepodge Hardware (also from the Occasions mini) threaded with Whisper White grosgrain.

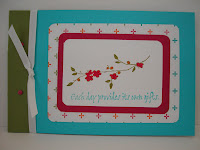
For the second card, I used Tempting Turquoise as a base, then layered on some Bali Breeze dp. I stamped the flower from Artfully Asian in Old Olive and coloured it in with my Stampin' Write markers (Rose Red, Old Olive and More Mustard). The sentiment is also from Artfully Asian, stamped in Turquoise. I layered the image on some Purely Pomegranate and put a couple of Artichoke brads in from the Rich Regals collection. Some turquoise grosgrain threaded through a Pewter Hodgepodge Hardware clip finished it off.

Thanks for stopping by, and I hope everyone has a great long weekend (or a happy Monday if it isn't a long weekend for you)!

As usual, all images and supplies are Stampin' Up!

Tagged and Nominated!

Amy tagged me with this one where you list a fact about yourself for each letter of your middle name. My mom actually had considered naming me Pansy, but she chose Shannon Nadine. I have such an Irish name, but not a drop of Irish in me!

Anyway, here goes:

N - Never late (at least I try!). My dad taught me that it is inconsiderate to keep people waiting, and he was always so irritated if I (or someone else) was late that I now always make a point of trying to arrive a few minutes early so as not to be rude.
A - Always tired! I feel like I haven't gotten enough sleep since my first son was born almost four years ago! I'm a night person, so I stay up until all hours, but then I like to sleep in late when I can, but with two little boys who are up early, I almost never get the opportunity!
D - Deeply spiritual. I have a personal relationship with Jesus and I love getting to know Him more through the Bible and prayer.
I - Independent - I like to do my own thing and be by myself a lot. I need alone time or I get really grouchy!
N -Nice (at least I hope people think I'm a nice person!)
E - Enthusiastic - when I get excited about something, I go all the way with it (Stampin' Up! anyone?)

Then, Corie nominated me for this Excellent Blogger Award! I'm so flattered.

I know a lot of you have been nominated for this (and deservedly so)! I will pass this award on to some people who have been really encouraging to me, both with their amazing work on their blogs and with their nice comments. Please check out these ladies' blogs because they are wonderful - both their work and the ladies themselves. I'm always so blown away by how nice the stamping blog community is!

Amy, for being such an inspirational, creative, encouraging person.
Diane, for being so positive and encouraging (she was the first person to subscribe to my blog!).
Teri, for all your help and inspiration. You are such a generous person.
Lee (a new blog friend) who is so positive and nice.

There are so many more people who inspire me, so please consider yourself nominated if you haven't been already.

Wednesday, February 13, 2008

Mini Photo Book Tutorial

I absolutely loved the mini photo book that Teri sent me (you can check it out here). She said it was actually from a kit she purchased and put together (I'm afraid I don't know the name of the company who made the book, but I will admit to totally CASEing the cover idea and the inside decorating from Teri!). So I decided to figure out how to make it from "scratch". Here are the steps (I put the colours I used in parentheses beside the dimensions for easy reference):

Supplies:
  • cardstock cover - 10-1/4" x 5" (Certainly Celery)
  • paper for inside frame - 5" x 5" (Blue Bayou Prints)
  • cardstock for inside cover pocket - 9-3/4" x 5" (Purely Pomegranate)
  • cardstock for inserts - 4-1/2" x 4-1/4" (Certainly Celery)
  • Round Tab punch
  • stamps
  • ink
  • sticky strip or other double-sided tape
  • corner rounder punch (optional)
Steps:

1. Score the cover piece at 5-1/8".

2. Make the frame by cutting a 2-1/2" square from the center of the paper (line up the paper at 1-1/4" and cut from 1-1/4 - 3-3/4" all the way around).

3. Put sticky strip around three sides of the frame, leaving about a half-inch from the edge (so that a photo will slide in without ripping the paper).


4. Score the inside cover piece at 5". Cut a triangle on the diagonal of the shorter side (4-3/4" of this piece).

5. (Optional) Use the corner rounder punch with the guard removed (or scalloped scissors) to create a scalloped edge along the diagonal.


6. Decorate the inside of the insert as desired (Blue Bayou Prints here) and put a piece of sticky strip along the bottom of the diagonal piece. Fold this over and adhere it to the square part of the insert to make a pocket.


7. Adhere this inside piece to the left inside of the cover. Adhere the frame to the right inside of the cover with the open end (non-sticky strip edge) at the scored line in the center of the cover.


8. To make the photo inserts, round the top corners of the pieces (the longer (4-1/2") sides are the top and bottom). Use the round tab punch to create tabs for the tops of the inserts. Decorate them as desired (for these photo mats, I used 3-1/2" x 3-3/4" Pomegranate and Blue Bayou pieces of cardstock and 3-1/4" x 3-1/2" pieces of Kraft cardstock). Insert these into the pocket.


9. Decorate the inside of the book and the cover as desired (see photos at the top of the post).

If you would like a printable version of this tutorial, please email me and I'll send it to you in Word.

Tuesday, February 12, 2008

A Great Mail Day!

Don't you just love it when you get goodies in the mail!? Yesterday, I was thrilled to receive some creations from two very talented ladies whose blogs I stalk whenever I get a chance!

Teri sent this blog candy that I won from her awhile back. The Canadian postal system is so slow that it took awhile to get here! Thank you so much for sending the stamps, photo book and adorable card, Teri!
Here's the inside of the photo book Teri made:
Then Corie sent this criss-cross card! I was so happy to receive this! She posted a ton of criss-cross cards on her blog after Christmas, and I was just drooling over them! Thank you so much, Corie!

Make sure you check out these ladies' blogs! They are so talented (and super nice as well)!

My Boys

I couldn't resist posting this photo I took of my boys on Saturday morning. They were playing and running around in their pyjamas, and they were just so cute (in my totally un-biased mom opinion! LOL!).

They kept hugging each other, laughing, rolling on the floor and wrestling! I hope they always get along this well.

Anyway, there's my proud mom bragging moment for the day! Thanks for indulging me!

Monday, February 11, 2008

Displaying Watercolour Paintings

Wow! I haven't posted in a long time. I've been really busy this week - good busy! I had Stamp Club on Monday, Shopping Club on Tuesday (this is a fun one!), my presentation to the Allied Arts Council on Wednesday, a workshop on Saturday (which was lots of fun), and now I can breathe for a bit!

Thank you to those who have been asking about my Art Council presentation. I was so nervous! I think I was shaking for the first half of the presentation! I actually started out talking about watercolouring, and once I showed them the Aquapainters, they were hooked! They were so impressed that they could paint without having to have a cup of water for their paint (lots of them said they are always spilling their water all over the place!), so that was exciting. After that, I relaxed a bit. They really liked that they could display their art in a "fancier" setting than just a plain card. They actually want me to come back and help them make cards for their Christmas Gallery (where they sell cards in the fall), so that's exciting.

I also showed emboss resist, Stampin' Pastels (a few things you can do with them), VersaMark resist, and using blender pens.

Here are some of the cards I showed them (including the one at the top of the post). My super-talented SIL, Twyla, painted the watercolour paintings for me, then I chose some colours that complemented the paintings and showed some different ways they could display the paintings in a card. I didn't want to make them too complicated because I didn't want to detract from the paintings - just to highlight them.

Monday, February 4, 2008

A Couple of Projects...

I've been busy creating tons of cards for some workshops I have this week. I'm very nervous because my first one is for our city's Arts Council. My SIL, Twyla, works for the Council and she called me last week to ask if I would do an "artsy" presentation for them at their monthly meeting. I have to admit that I'm very intimidated. I don't consider myself an artist at all - I just stamp and put the paper together! It's not going to be a typical workshop because I'm supposed to focus more on the art supplies than on the stamping itself and how they can use the supplies to showcase their artwork.
I have about fifteen cards ready to show that all use different techniques, so I had to keep them fairly simple but still showcase the techniques and products - quite a challenge! My SIL is a fantastic artist, and she painted some beautiful watercolors for me to display on some cards. I'll post those after I finish the workshop since I can't duplicate them and I want to put them together at the show. (I also have to get her permission to show them!).

Anyway, this card is one I made to show how to use blender pens to colour with Stampin' Pastels. It's pretty easy - I stamped the image from Artfully Asian in Basic Black, then coloured it in with Ruby Red and Garden Green chalks. I matted it onto some Ruby Red and adhered that to the Wild Wasabi base. I used the photo corner punch to make some black corners, then stamped the sentiment in Basic Black.

This next project is actually something I was playing around with to see if I would like to use it as a hostess gift. I found these adorable coaster post-its holders here on Wanda's blog (My Creative Corner). I thought it was such a cute idea. It's just a 4-inch square coaster covered with some Bali Breeze designer paper. I covered the clip with a bit of paper as well, then I adhered the post-its to the coaster and put the clip on top with some turquoise ribbon tied around it. The bottom strip is a piece of Tempting Turquoise stamped with a sentiment from Much Appreciated. I put some magnetic strips on the back so it can hang on the fridge. I also made a matching pen with a strip of designer paper in an RSVP pen. The only puzzler is how to get the post-its off without having to take the clip off. Any ideas?

Thanks for visiting! These should get us two more numbers on Barb's Bingo!!!

By the way, a couple of my blog friends who visit me regularly have recently begun their own blogs, so be sure to check them out:
Lots of people have been telling Diane to start her own blog for quite some time, and she finally did! Check out ddnjoys2stamp. Diane's niece, Shannon (great name, BTW!) also recently started her own blog. She's at Tyrymom Stamps Alot.

Friday, February 1, 2008

A Pretties Valentine

Here's a card I made for Splitcoast Stampers' Sketch Challenge 161. I thought I'd make it into a Valentine's Day card, since that's what I'm in the mood for!

I finally broke into my Pretties kit for this one. I'm such a hoarder of supplies. I got the kit months ago, but I couldn't bring myself to use them. I always wait for just the perfect project because I don't want to "waste" my supplies! Anyone else like that? I finally just decided to go for it. There really are a ton of flowers in the kit, and I'll have to use them eventually!

Anyway, I started with the designer paper and went from there. This is from the Bali Breeze designer series paper. I decided to go with Purely Pomegranate and Pretty in Pink to accent it. I dyed the big flower with my Pretty in Pink Stampin' Write marker and the little flower with my Purely Pomegranate ink pad (I just smooshed it into the pad!). The rhinestone brad is also from the Pretties kit. The sentiment is from Holidays and Wishes, stamped in Pomegranate.

Thanks for reading, and I hope you all have a great weekend! It's finally starting to warm up here, so I'm hoping to get out of the house this weekend!