Monday, December 31, 2007

Pencil Holder Tutorial

I found this cute little pencil holder in the September 2007 issue of Stampin' Success magazine (SU!'s downline magazine), and I thought it would be a great project to include in my newsletter. Here's a quick tutorial on how to make it.
1. Start with a 5 x 7" piece of cardstock (I used textured River Rock). Score it horizontally at 1 7/8" and 4", then score it vertically at 7/8". Cut out the top corner pieces as shown, then round the tab corners with a corner rounder punch.


2. As an embellishment, I added a 2 1/8 x 1 1/2" piece of designer paper, punched with the spiral punch. I used the new Ginger Blossom designer series paper for this piece.


3. Stamp the outside as desired. I used the new Embrace Life set with River Rock and Bravo Burgundy ink.


4. Adhere it shut with a strong adhesive - I used sticky strip because I wanted to make sure that it would stay closed with the pencils in it. Then all you need to do is finish the embellishments (I used Bravo Burgundy 5/8" grosgrain ribbon above) and slide some pencils in it!

Sunday, December 30, 2007

Scrapbooking Club Journal

I was so excited to have a chance to play with some of my new stuff this weekend! I'm starting a Scrapbooking Club in January, and this is what we'll be making at the first meeting. I will give the credit to Roxane, from whom I totally CASEd this idea!

It's the SU! On Board Art Journal, which the ladies will get to decorate as they'd like, and will keep their class notes in it. It incorporates a lot of scrapbooking techniques in it, including titles, designer paper, colours, embellishments (chipboard, ribbon, tags, etc.). I used the new Ginger Blossom designer paper for the cover and the spiral punch to fit it into the rings. Then I stamped the letters from the Big Deal Alphabet in Ruby Red, Cameo Coral, River Rock and Groovy Guava on Very Vanilla and made tags out of the same colours of cardstock. The word "Scrapbooker's" is stamped in Ruby Red on River Rock cardstock with the Rough Edges Alphabet. I used Mellow Moss grosgrain and Very Vanilla taffeta ribbon on the tags. For the chipboard, I used the On Board Blossoms, coloured it with a Cameo Coral Stampin' Write marker, then smooshed it into VersaMark and embossed it with Iridescent Ice embossing powder.

Inside the book, there are tabs (using the Round Tab punch) for journaling different techniques, so the ladies can add class notes as they like, as well as their own notes and ideas as they come across them. For example, there is a section for quotes, so if they find a quote they like in a magazine or online, they can jot it into the journal. The sections are Archival Approach, Colour, Cropping, Design, Journaling, Quotes, Styles, Titles, Miscellaneous (again, thanks Roxane for this!). This way, you don't need to have a ton of scrapbooking magazines when you go to a crop night - all your ideas are in this one little book! As we meet monthly, the ladies will add to their journals and complete 12 x 12 layouts at the club.

I'm really excited to be starting this club this month! If you're in the area and interested in joining, please contact me.

Saturday, December 29, 2007

I'm Back - and I Have Some RAKs to Share!

We got back from B.C. late Thursday night. We had so much fun with my mom and step-dad. It was just too short a visit. The photo above is the view from their balcony. How gorgeous is that? That's Lake Okanagan and the mountains beyond it. The weather was just beautiful - warm, but with lots of snow, so Adam could play outside. I always love going home to Mom and having her cooking! I just can't seem to make turkey stuffing as well as she can! I guess a girl always needs her mommy. The only rough part was the loooong drive which seemed longer with two whiny toddlers in the back of the van! I guess that's parenthood!

Anyway, I returned to find some goodies in my mailbox that I wanted to share with you.
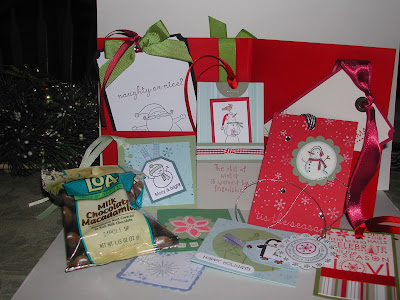
Teri (Big Ideas From a Little Girl) sent me this beautiful tag holder filled with amazing Christmas tags, along with an instructional CD and a package of chocolate covered macadamia nuts (my favourite!). Thank you so much, Teri! I just love them! Just look at all those gorgeous tags!This beautiful card was made by Candace (Crazy for Papercrafts). I just love the Frosty set, so was happy to see yet another way to use it. I love the Sage Shadow and Soft Sky with this card. I hadn't thought to use those colours with Frosty! And didn't she do a great job on the shading!? Thank you, Candace! I love it!

I also received a cute card in the mail from my mother-in-law and partner in stamping, Margo. She made this wreath card using the Three For All punch box punch. Love it! Thanks so much, Margo. (Margo doesn't have a blog yet, but I think she should! She makes tons of cards to sell and donates all the proceeds to breast cancer research. How wonderful is that?!)

Saturday, December 22, 2007

Merry Christmas to All...

I have one last Christmas card to post, and then I'm starting my holidays! Both of our boys are so excited to see their grandparents, and of course, to get presents!

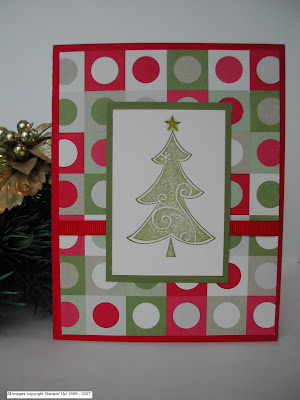
This card is the one I made for DH - I was trying to use up some of my Dashing paper since it's retired (*sad face here*). This is a pretty simple card. I used Real Red as the card base, layered on the designer paper with some Real Red grosgrain across the bottom. Then I stamped the tree from Season of Joy (I'm really hoping this set makes it into next year's Fall/Winter Collection) in Old Olive on Very Vanilla cardstock. I layered this on some Old Olive cardstock before adhering it to the card. I finished off with some Crystal Effects on the star at the top of the tree, just to give it some bling (I should have put some glitter in it, but I wasn't thinking at the time!).

Anyway, I want to thank you all for visiting and wish you and your families a Very Merry Christmas and God's blessings in the New Year! I'll be back to blogging next week, and I can't wait to see what everyone has been up to over the holidays!

Friday, December 21, 2007

And the Winner is...

It was so nice reading what all of you are doing for the holidays. It looks like most people will be spending time with family and eating lots! Sounds great!

I used random.org to select a number between 0 and 32.

And the winner is...#21 - Diane Noble! Here's Diane's comment:
We will spend Christmas day at our house with my parents and two grown sons coming. Gone are the days with little ones clamoring around the tree. It's quieter now, but oh, so precious when family is together. Later in the week extended family will gather at my sisters, spreading Christmas celebrations out over a full week!

Congrats on all your hits! You're ahead of me but I'm just getting started at all this and so look forward to other great connections with artists all over the world!!

Diane will receive the Oh So Lovely stamp set, an assortment of 12 x 12 SU! designer series paper (including Apple Cider, Baroque Motifs, Dashing, Cerise, Wintergreen and Petals & Paisleys), a Real Red Stampin' Write marker, some gold and silver elastic cord, some Chocolate Chip silk ribbon, some pink ribbon, and an assortment of embellishments (including brads, chipboard accents, Real Red zig zag ribbon and some buttons). Diane has a wonderful blog, by the way! Make sure you check out Diane's Designs.

Congratulations, Diane! Please email me with your address so I can send this off to you.

Merry Christmas, everyone, and thanks for visiting!

Blog Candy for 15 000+ Hits!

Please scroll down for new posts - I'll leave this at the top until December 21.

Okay Everyone, it's Blog Candy Time! My counter hit 15 000 last week, so I'm offering some yummy Stampin' Up! blog candy! Thank you to everyone who visits my blog regularly. I do appreciate it! I've met so many good blog friends here, and I'm so grateful and amazed!

Since I haven't had time to pull together all the blog candy and take a photo, I'm going to copy Alex (California Stampin'), who by the way is also offering some blog candy, so check it out! I'm going to offer some "wrapped" candy - you'll find out what it is after I select a winner. It will include a Stampin' Up! stamp set, some 12 x 12 SU! designer paper and some assorted embellishments (some SU!, some other).

Here's how to win: simply leave me a comment and let me know what you're doing for Christmas this year, if anything! I'm interested to know how people around the world will be spending the holidays. Our family will be going to British Columbia for a few days to visit my mom and step-dad. (Yay! A long van ride with two little kids!!! Thank goodness for the DVD player! LOL!) Mom always cooks a ham dinner on Christmas Eve and a turkey dinner on Christmas Day, so there should be some good eating! Afterwards, we'll have a late Christmas with my in-laws here in town. Our boys will exchange gifts with their cousins and we'll have a yummy supper afterwards (do you see that food is a theme here?).

Anyway, I'll leave this open until Friday, December 21, then I'll use random.org to choose a winner. Thanks again for visiting!

Tuesday, December 18, 2007

Bayou Birthday

I don't know about anyone else, but I am so sick of making Christmas cards! It was fun while it lasted, but I started in September, so I've about had it! I still have to make a few more to give to my family, but I'm just not feeling it right now!

I decided to take a break from Christmas and make a birthday card for my step-father, whose birthday is in January. I always have such a hard time with masculine cards, so I bought the Blue Bayou Prints designer paper specifically for the boys and men in my life! I'm going to make my son a piggy bank for Christmas using it (altering a can). But I digress...

This is a sketch from the SU! demo website. I used Blue Bayou, of course, as my card base and layered on the designer paper. I attached some double-stitched ribbon across the front and embossed the sentiment from Sincere Salutations with white ep. For the image, I used Baroque Motifs (this stamp set can be used for ANYTHING!). I stamped the big flourish in Soft Sky, then stamped the big image in Blue Bayou over top.

Finally - A Date with DH!

DH and I went to see Michael W. Smith with the Edmonton Symphony Orchestra in concert last night!!! Oh my goodness! What amazing sound. The concert was at the Winspear Centre, which was built to have the most amazing acoustics. Then to hear MWS's Christmas songs with the symphony backing him was heavenly. He also had the Katinas and Melinda Doolittle with him, and they sang with him as well as singing their own solos. What beautiful music. Melinda Doolittle sang "All is Well" and just about blew the roof off the place - what a powerful voice!

Just to get out of the house and have a date with my hubby is nice, but to hear this kind of music was just thrilling. If you can see him in concert, especially if he's performing with a symphony, I highly recommend going. It really gets you into the Christmas spirit!

Sunday, December 16, 2007

Stampin' for the Kids

I have to just say how inspired I am by all the generous things people are doing for others this holiday season. For example, Teri (Big Ideas from a Little Girl) asked for people to send her socks, which she donated to the seniors' centres in Hawaii.

About a month ago, Candace (Crazy for Papercrafts) offered some blog candy for people who told her what they would be doing to help others this Christmas. Her idea for herself was to make cards for children to colour and to donate to the Children's Hospital in her area. Well, I was so inspired by her that I decided to copy her idea! Thanks, Candace!

Last week, my MIL, Margo, came over and we stamped cards like crazy all afternoon. We put together these packages of four cards with a box of crayons that we will be delivering to the Stollery Chlidren's Hospital here in Edmonton so the kids can colour them. The first card is actually a little flip book that Margo made using the retired set Mixed Up.

I challenge all of you to think of something you can do to bring some joy to others this Christmas, and please post a comment here to let us know what you decide to do or what you have already done!

"For I was hungry and you gave me something to eat, I was thirsty and you gave me something to drink, I was a stranger and you invited me in, I needed clothes and you clothed me, I was sick and you looked after me, I was in prison and you came to visit me... the King will reply, 'I tell you the truth, whatever you did for one of the least of these brothers of mine, you did for me.'" (Matthew 25:35, 36, 40)

Thursday, December 13, 2007

BLOG CANDY(s) and an Announcement

First, Alex (California Stampin') is offering some yummy "wrapped" blog candy for 7500 hits ("wrapped" as in we'll find out what it is later - but she promises it will be good, and I know it will be!) Check it out here. Congratulations, Alex!

Second, I noticed that my counter turned over 15 000 hits today! Thank you all so much for visiting! I will be putting up some blog candy this weekend, so please come back to enter for your chance to win!

Third, I've been feeling like I'm burning the candle at both ends, so to speak, and I've had to do a lot of thinking and praying about how to spend my time so I don't burn out and drive my family insane! So with that in mind, I have decided that I need to cut back a bit on my blogging (*sob*). I've been trying to post every day and check out others' blogs every day, but it's just taking up too much time (I am a SAHM, so I should probably spend some time with my kids! LOL!). Anyway, I'll only be posting a couple of times a week and blog surfing on weekends. So I do hope you'll continue to check in with me. I appreciate all the encouragement I receive from all of you in Blogland! And if you don't hear from me on your blogs during the week, I haven't forgotten about you, and I will be visiting on weekends! Thanks again for your support and understanding!

Flaky RAK!

I wanted to show this card that I received in the mail from Diane (aka dd2njoy). Isn't it adorable?! I love the cute snowmen! Inside, she stamped "Some of my best friends are flakes" from Flaky Friends. That's one of my favourite sentiments - it makes me smile every time I see it! Thank you so much, Diane! I just love this card! I'm still waiting for you to start your own blog!

Wednesday, December 12, 2007

More Notebooks!

Here are the other two journals I made. They are for two girls in junior high who look after our children during our ladies' Bible study at church, and I also teach them piano lessons. Since they are students, I wanted to keep the notebooks fairly simple and flat so they wouldn't be crushed with their other books!

For these ones, I used Science notebooks instead of coil ones. I think I like these better than the coil scribblers! I started with some designer series paper for the bases - Apple Cider and Porcelain Prints, respectively. I attached the paper with spray adhesive.

I personalized them for the girls by sponging their initials on the cover using the Lower Simon chipboard letters as a stencil (I punched out the letter, then sponged inside the stencil that was left). For the Apple Cider notebook, I chose Groovy Guava and River Rock as my accent colours. I added Apricot Appeal ribbon because I don't have any Guava ribbon, but I think it blends! The stamped images are from All Through the Year. For the Porcelain Prints notebook, I used Blue Bayou and Wild Wasabi as the accent colours. The stamped images are from Wild Rose.

I made matching pens for both girls. I used the RSVP pens and just rolled up some designer paper to fit inside them.

Tuesday, December 11, 2007

Wild Rose Notebook

I really love the Porcelain Prints designer paper - mainly because it goes with Blue Bayou and Wild Wasabi, my favourite SU! colours.

I made this notebook for a friend of mine. I started with the leafy paper. I clipped the pages together on the right, then removed the coil. I always use a spray adhesive for my notebooks, so I sprayed the paper and the notebook cover with adhesive. After letting the adhesive set for an hour, I put the paper on the cover.

Then I decorated. Since the paper goes with the Wild Rose stamp set, I had to use that! I stamped the big rose in Blue Bayou and the leaves in Wild Wasabi and cut them out. I adhered the leaves behind the rose and stuck the whole thing on the notebook with a dimensional. For the bottom strip, I layered Blue Bayou, Wild Wasabi and Very Vanilla cardstock. I stamped the leaves over it, wrapped the double-stitched Blue Bayou ribbon and stamped "cherish" from Baroque Motifs on it.

After the whole thing was finished, I punched holes along the left side so the coil would go through. Then I wound the coil back through the notebook.

I have a few more notebooks that I'll post tomorrow.

I also noticed that I'm getting close to 15 000 hits, so that means it's almost BLOG CANDY TIME!!! Stay tuned this weekend for that!!

Monday, December 10, 2007

Frosty's Last Chance!

I'm a little sad that Frosty is on the retiring list - he's a cutie! I thought I'd make some cards with him while I still can.

This year for my Christmas cards, I didn't make all of my cards the same. Since I'm sending over a hundred cards out, I thought I'd get pretty bored if I made a hundred of the same card! So I chose a few favourites and made twenty of each. Plus, I'm going to use all my sample cards as well, so there will be a big mish-mash of cards out there from me.

This is one of the cards that I made a bunch of to send out. I'm really into blues this year for my Christmas cards, so I dipped into my blog candy winnings again (see this post) for this snowflake paper.

I used Whisper White as the base since it's easier to write in than Blue Bayou, which was my other choice. I stamped the swirls in Blue Bayou all over the card base, then I adhered a strip of the designer paper across the bottom. I stamped Frosty on some Whisper White and coloured him in with my aqua painters (I used Blue Bayou and Wild Wasabi ink for this). For the nose and berry, I used my Stampin' Write markers (Apricot Appeal and Real Red). Then I adhered this to some Blue Bayou cardstock and sponged Blue Bayou ink all around the edges. I finished it off with some double-stitched ribbon, then adhered the whole thing to the card.

Stay tuned tomorrow - I made some altered notebooks as gifts for people, and since I'm giving them the notebooks tomorrow, I can post them after that!

Saturday, December 8, 2007

A Wedding Card

This is a card I made for a wedding we're going to today. I started by taking some of the wrapping paper I used to wrap the gift, then I went from there!

There were some silver and pale peach tones in the paper, so I used Blush Blossom as the card base. Then I layered some Brushed Silver cardstock on top of that. I used the ticket corner punch on the silver and the wrapping paper.

I pulled out my Rubber Soul wedding stamp set for this card! I don't get to use it often, so I was excited to get to try it out! I stamped the image and the greeting on Shimmery White cardstock with VersaMark and embossed it with silver embossing powder. I sponged Blush Blossom ink on that to blend it with the cardstock. For the top image, I layered some Blush Blossom under it before adhering it to the wrapping paper. For the greeting, I layered some Very Vanilla taffeta ribbon across the bottom of the card, then punched the greeting with the ticket corner punch before adhering it over top. I put a couple of little pearl beads from my SU! Pretties kit on the sides using mini glue dots. And there you have it!

Of course, I made a bow out of the wrapping paper as well, so the gift paper, bow and card all coordinate! I'm such a nerd!

Anyway, I'm looking forward to the wedding. It will be lots of fun! Congratulations, Susan and Caleb!

Friday, December 7, 2007

Stamp Club Gifts

I made these little packets of 3 x 3 cards as Christmas gifts for the ladies in my stamp clubs. Each packet has these three cards in it with envelopes. I made them all with Very Vanilla as the base.

For the one on the far left, I made a one-sheet wonder with Wild Wasabi and Purely Pomegranate ink using my Baroque Motifs set. Then I cut it into squares and matted it with Wasabi and Pomegranate.

For the centre card, I stamped the flourish from Season of Joy on the base with Night of Navy ink. Then I punched a Navy scallop circle and a Bashful Blue 1 3/8" circle. I stamped the design from In the Spotlight on the circle with Night of Navy ink.

For the far right card, I put a strip of Dashing designer series paper along the left side of the card. I stamped the snowflake from Perfect Presentation in Real Red on Very Vanilla cardstock and punched it out with the small tag punch. I layered that onto Old Olive cardstock and punched it out with the large tag punch. I adhered this to the card and stamped "from the heart" from Holidays and Wishes in Old Olive.

I had to make the cards fairly simple since I had to make 20 of each one. I packaged them in the medium cello bags, folded the bag over so it fit the cards, then tied some ribbon around the tops.

I also made a card tonight for a wedding I'm going to tomorrow, but it's too dark to take a photo, so I'll take one tomorrow and post it after the wedding! Thanks for stopping by!

*All supplies are Stampin' Up! of course!

Thursday, December 6, 2007

Super Easy Gift Box

This is a little gift box that my friend, Kristine, showed me how to make. It's super easy (what else would I do?!). Here's how to make it:
  1. Take a 12 x 12 sheet of cardstock (Garden Green here - I would have used Old Olive to match the paper, but I didn't have any!). Score the cardstock every 4 inches horizontally and vertically, so you have nine 4-inch squares.
  2. Cut out the four corner squares with your paper cutter or scissors.
  3. Decorate the four outside squares as desired - leave the center square blank (I just adhered some Dashing designer paper to the outside squares).
  4. Attach an eyelet to the outside corners of each square (gold ones here).
  5. Fold up the sides and tie the corners together through the eyelets with cord or ribbon (I used Real Red 1/4" grosgrain).
I wrapped this gift with some red tissue paper. It's a perfect little gift box for jams, antipasto, etc. This one has some Victorian Epicure Cheese, Chives and Bacon dip mix in it! Yummy!

Random Acts of Kindness

My husband volunteers with our church's Youth Group, and last week, they had a Random Acts of Kindness evening. Before they began, the youth pastor gave the kids some books of Tim Horton's gift certificates. Then, my husband drove a group of kids around town while they did RAKs for people. I almost cried when my husband told me what some of the kids came up with to do for strangers. They went to Tim Horton's, stood at the till, and paid for people's coffee or donuts. They brought donuts to a needy family from our church. They did so much more, and my husband said they thought of all the things; he just drove them there. In this age when a lot of adults have such a negative opinion of teenagers, I thought it was so great that they were doing a positive thing. DH said that people were so thrilled and moved to have the teenagers help them.

So on that note, here is a list of RAKs that you can do for people (our youth pastor, Dade, gave us this list). I'm challenging myself to do some of them in the coming weeks. I challenge you to do the same! (By the way, our church is not sponsored by Tim Horton's, as you may think from this list! LOL! A lot of people at our church just like the coffee there!)
  1. Collect non-perishable foods from your house and drop them off at the food bank bin at Safeway (or other grocery store).
  2. Sing a Christmas carol at one of the seniors' centres in your area.
  3. Give a stranger a Tim Horton's (or coffee) gift certificate.
  4. Buy a cup of coffee for someone in line at Tim Horton's.
  5. Pay for someone in the drive thru at Tim Horton's (or another restaurant).
  6. Shovel a stranger's driveway.
  7. Bring coffee and donuts to someone you know.
  8. Give someone you know a phone call and give him/her a word of encouragement.
  9. Go to someone in the church you know that needs prayer and pray for him/her right there together.
  10. Write a thank you card to someone you know telling him/her something you appreciate.
  11. Find a homeless person or someone in need and buy him/her a meal - sit down with him/her.
  12. Help someone load her groceries into her car at the supermarket.
  13. Offer to pump someone's gas.
  14. Buy coffee and donuts for the police/fire department.
  15. Find an area, parking log, fast food place, gas station, etc. and pick up the garbage on the ground.
  16. Phone a teacher and thank him/her for doing such a great job with your children.
  17. Tape a quarter to a pay phone with a note welcoming anyone who needs it to use it.
  18. Leave some quarters in the pay shopping carts at Safeway (or other grocery store).
  19. Offer to babysit for a busy mom and give her some time to herself.
  20. Offer to do some housework for a busy mom.
These are just a few ideas. If you think of some more, please post them in the comments!
God bless!

Tuesday, December 4, 2007

"Peace"-ful Snowman

I love sketch challenges because I probably wouldn't make any cards just for fun without them! Maria (Stampin' Inspirations and Card Inspired) always has lots of great sketches on her blog. This one is for day two of her blog candy challenge.

I used the designer paper I just won from Jenny (Stamping Moments) with some Blue Bayou as the base. I made it a 4 1/4" square card. After I adhered the snowflake paper across the bottom, I sponged Blue Bayou ink around it to blend it with the cardstock. I then layered some Whisper White and Blue Bayou on top (sponged with ink as well) with some double-stitched Blue Bayou ribbon. This was a different card for me because usually I stamp the focal image. But the snowmen on the designer paper were so cute, I cute one out and used him as the main image. I finished off by stamping "peace" from Everyday Flexible Phrases (at least there's some stamping on it!) on Whisper White and punching it out with my small oval punch. I sponged more ink on that before adhering it to the ribbon with a mini glue dot.

Here's a copy of Maria's sketch:

Thank You, Jenny!

Allison (Stampin' When I Can) posted awhile back saying she's never sure whether or not to post her blog candy winnings. I totally agree - I don't want to seem like I'm bragging about winning because that's not the case. On the other hand, I think it's important to acknowledge the person who sent the blog candy and thank her publicly since she went to the trouble of buying it, posting it on her blog and mailing it. That being said, I did win some blog candy (I'm not bragging!), so I want to thank Jenny for sending it!

I won this blog candy from Jenny (Stamping Moments), whose blog I have been stalking lately! She is a very talented paper crafter who just signed up with Stampin' Up! since the company recently arrived in the U.K. She's very excited about it, and she's been making tons of stuff with her SU! supplies, so I've been checking her blog daily to be inspired! Go have a look for yourself - you won't be disappointed!

It took awhile to get here from England, so I'm very excited that it's here! Thank you so much, Jenny - I just love it! It's a package of 12 x 12 paper (all Christmasy! It matches Blue Bayou perfectly!) and some matching stickers! Now my dilemma is whether to use it for cards or save it for some scrapbooking! I'm such a hoarder of supplies, and I always want to make sure I use my things for just the perfect project, so I end up not using my nice stuff! I think I'll make a few Christmas cards with this, then save some for scrapbooking. Okay, problem solved!

Decorating the Tree

One of Maria's challenges today was to show a picture of our Christmas trees or a Christmas decoration in our house. I thought I'd show a close-up view of the boys decorating the tree (this is from last weekend). Adam found a spot on the tree and went to town! It took every bit of strength I had not to rearrange the ornaments once he went to bed! I knew he would be heartbroken if they weren't in the same spot, so I left them (oh, the sacrifices we make for our children! LOL). This was Noah's first year getting to put ornaments on the tree, so he was really excited! He actually did pretty well. He spread them out nicely, though a lot of them ended up on the floor! We had lots of fun.

If you haven't checked out Maria's blogs yet, make sure you do (Card Inspired and Stampin' Inspirations). She's giving us lots of chances to enter her blog candy draw! Plus, her work is beautiful - lots of tutorials, cards, techniques, sketches, and funny stories. Take a look!

Here's a look at the finished tree. I must admit that my trees looked a lot more "finished" in our B.C. days (before children)! You'll notice the huge concentration of ornaments at the bottom of the tree, leaving the top portion a bit sparse! Oh well!

Sunday, December 2, 2007

My Work Space (for Maria!)


Maria asked us to show a photo of our work stations in their present state as one of her challenges in her blogging birthday blog candy giveaway. (See here for this challenge.) By the way, you should definitely check out her blogs (Card Inspired and Stampin' Inspirations) Her work is fantastic, and I love that she includes a sketch for all the cards she posts. Very helpful! She's also got some great blog candy this week!

Anyway, you can see that I'm in the middle of tons of projects, but never finishing any of them! I'm a little embarrassed to show the current condition! (I have a previous post here where it is actually cleaned up if you'd like to see.) I actually do my work on the white table at the front, and store all my stuff on the back table. I'm in desperate need of a storage unit! That's on my wish list for when we come into some money! We were also asked to add a "calming" piece to our work area so that we can experience some serenity when we look at it. I guess I need that in my work space! It's hard to see, but I added a vase of pot-pourri to the far left of my white table. I love the smell of it (it's a citrus scent), and I love the vase as well, so it will be nice to have it there. (I just hope I don't knock it over with all my mess!).

Saturday, December 1, 2007

Christmas Gift Bag

This has to be the easiest project ever! I found these bags at Deserres (but I’ve seen them at Michael’s too). They have all different colours and sizes, and they’re very reasonably priced. I think these medium-sized ones were $0.85. So, you just have to stamp all over it and decorate it as you’d like.

For this one, I used my Mistletoe wheel with Bravo
Burgundy ink and rolled it along the top and bottom edges on both sides of the bag. Then I used the Peaceful Wishes stamp set to create the design for the center of the bag. I stamped the main image on Whisper White cardstock with Always Artichoke and Bravo Burgundy (I used my Stampin’ Write markers to get the two colours on the stamp). Then I matted that on Bravo Burgundy and Always Artichoke. I made a scalloped edge on the Artichoke paper with my corner rounder punch. Before adhering this to the bag, I stamped the pine branch, pine cone and berries underneath in Artichoke, Close to Cocoa and Burgundy.

I made a coordinating gift tag for the bag by making a 3 x 3 card in white, then layering the Artichoke and
Burgundy squares. Finally, I stamped images all over a 2 x 2 square of white cardstock before adhering it to the card. I punched a hole in the corner and used some burgundy ribbon to tie the card to the bag’s handle.

I'm going to make a bunch of these!