Sunday, September 27, 2009

Scrapbook Club Layout

Okay, this photo didn't quite work out as planned - the glare of the flash kept reflecting off the letters in the center, but not on the edge! And if I took the flash off, it was too dark. So please forgive the bad photo - the page looks a lot more impressive in real life!

Anyway, my new Scrapbook Club is having our first meeting tomorrow, and I thought we'd start with a Halloween layout. I used the Cast-A-Spell designer series paper and pulled the Pumpkin Pie and Basic Black from there. For the letters, I embossed the Jumble Alphabet letters with white embossing powder, then sponged some white shimmer paint over them for a spooky look (which, as I mentioned above, looks way better in real life!).

The pumpkins are cut with the pumpkin Sizzlitz die using the Big Shot. I sponged some Pumpkin Pie ink around the edges to give them some texture. For some added embellishments, I put some Basic Black gingham ribbon around the main photo matte and added a Pumpkin Pie corduroy button.

I'm looking forward to meeting everyone tomorrow night! I have quite a few new ladies coming, some of whom I haven't met yet, so it should be lots of fun!

Thanks for reading!

Blessings to you,

Friday, September 18, 2009

Shimmery Snowflake

This is a card i designed to use at workshops because it is simple and it showcases some items in the Holiday Mini catalogue. I bought the Platinum Shimmer Paint a few weeks ago, and I've finally discovered a few ways to use it. For this card, I painted the shimmer paint right onto the stamp from Serene Snowflakes with a paintbrush and stamped it onto some Whisper White cardstock. It`s hard to tell from the photo, but it`s really shimmery in real life! (I've ordered the White and Champagne Shimmer Paints, so I think that when they get here, I might brush some white over the whole image to make it shimmer more...)

Here's the complete recipe:
Stamps: Serene Snowflakes
Ink: Night of Navy
Paper: Bashful Blue, Night of Navy, Brushed Silver, Whisper White
Accessories: Platinum Shimmer Paint, Whisper White Organdy ribbon

Just a quick post today! I haven`t had much stamping time since school started, but I`m hoping to get some in next week so I`ll have more to show you!

Blessings to you,

Thursday, September 10, 2009

First Stamp Club Meeting!

I love September when new clubs and activities start up! It's like the first day of school for grown-ups! I am excited to be offering two clubs this year. For our first meeting, the ladies will be making card keeper boxes with the Stampin' Up! Forget-Me-Not Keeper. We will decorate the divider cards with different themes so the ladies will have a place to store the cards they make this year. The first night will be a busy one! With twelve stamping stations to make their dividers, I'm sure it will be a stamping frenzy! But lots of fun!

Here are the divider cards we'll be making, and which we'll attach with bits of sticky strip or mini glue dots:
Thanks for stopping by today!

Blessings to you,

Tuesday, September 8, 2009

Simple Masculine Birthday

Okay, this is probably one of the easiest cards ever! Again, I had to mass produce it for a friend who wanted a bunch of masculine birthday cards!

I just got the Pendant Park stamp set, and I thought it made a nice masculine image. It's stamped in Always Artichoke on Very Vanilla, layered on some Artichoke cardstock.

The card base is Naturals Ivory. I paper pierced some holes around the corners of the stamped image piece with the mat pack and paper piercer. At the bottom corner, I added some Sahara Sand eyelets (now retired) and stamped the sentiment from Teeny Tiny Wishes in Always Artichoke.

Quick and easy!

Blessings to you,

Monday, September 7, 2009

Cottage Birthday

I have a friend who asked me to make a whole bunch of birthday cards for her, so I came up with this one. It's quite simple (I really like quick, simple cards!) because I had to make quite a few of them!

Here's the recipe:

Stamps: Asian Artistry, Teeny Tiny Wishes
Ink: Basic Black, Stampin' Write markers (Mellow Moss, Rich Razzleberry, Pale Plum, Close to Cocoa)
Paper: Cottage Wall dsp, Pale Plum, Rich Razzleberry, Whisper White
Accessories: Eyelet Border punch

Blessings to you,

Sunday, September 6, 2009

Delightful Decorations

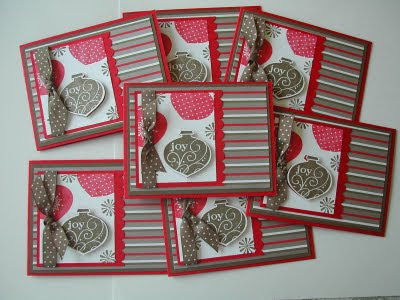
This is a card I made for a Holiday Mini swap that my friend, Donna, hosted on Splitcoast. I love this new Christmas Cocoa designer series paper, so I used that as the base and chose my colours from there (Soft Suede and Real Red). It's hard to tell from the photo, but the "joy" ornament is actually punched out with the Ornament punch and raised on dimensionals for a 3-d effect. When I get my other swap cards from this, I'll post them here. I'm excited to see what everyone makes!

Thanks for stopping by today!

Blessings to you,

Thursday, September 3, 2009

Cheep Birthday Tri Shutter

I wanted to show the ladies in my downline how to make a Tri Shutter card, but I wanted to keep it fairly simply embellished to make sure I had enough supplies for everyone and to make sure we could finish it during our meeting!

I came up with this Happy Birthday card using the Cheep Talk stamp set and the Tall Tales designer series paper. It's pretty quick and simple, but I think it's still fun!

Just a quick post today! Thanks for reading!

Blessings to you,

Tuesday, September 1, 2009

Upsy Daisies Laptop


I was so excited to decorate my new laptop with the Upsy Daisies decor elements! I just got my laptop so that I can demonstrate the upcoming My Digital Studio digital scrapbooking program that Stampin' Up! is coming out with (available October 1).

I've been wanting to try digital scrapbooking for quite awhile, and when Stampin' Up! announced in January that they would have a program this year, I was beyond ecstatic! So I've been (im)patiently waiting until it's available, and I finally got to pre-order my demonstrator copy today!

Anyway, my husband thinks I'm crazy for decorating my laptop, but I think it's pretty!

Blessings to you,