It's been a busy few days! We have a guest staying with us for two weeks - she arrived yesterday from Germany. My husband's school participates in a student exchange program with a school in Germany, and last year my husband went with the students (while I stayed home eight-and-a-half months pregnant and a two-year-old running around - but that's another story, and I'm not at all bitter! LOL!). He stayed with a teacher and her family there and they were so wonderful to him. Now she's here with her students and she will be staying with us for a few weeks. She's a very nice lady, so I'm looking forward to getting to know her better.
Needless to say, I haven't been able to get much stamping done lately, and I probably won't for awhile since she's staying in our basement guest room. All my craft stuff is in the basement, and I don't want to intrude on her space, so I'll try to sneak some stamping time in when she's off with the students! I'll try to get some things posted, but they may be sporadic, so I hope you'll still check in once in awhile and bear with me!
In the meantime, here's a baby card I made for a friend's shower this weekend.
I think I've mentioned before that the only baby set I own is I'm Here, so all my baby cards are made with this stamp set! I used Beate's weekend sketch challenge #19 from a few weeks ago for this design. I used Bashful Blue for the card base, then sprayed it with my color spritzer and Not Quite Navy marker. I then layered Brocade Blue and then Whisper White. The hand is stamped in Night of Navy, stamped off once. The sentiment is from Holidays and Wishes, stamped in Night of Navy. For the strip across the bottom, I layered Night of Navy, Brocade Blue and navy grosgrain ribbon, then put three Brocade Blue brads in the left side (from the Rich Regals brads).
Well, I hope you like it, and hopefully I'll be able to get some more stuff up here soon!
Thanks for visiting, and have a great day!
Sunday, September 30, 2007
Saturday, September 29, 2007
BBF Award
How cute is this! I received this Best Blog Friend award from Amy from AmyGDesigns. I recently discovered her blog, and it's fantastic! Make sure you check it out.
I'm going to nominate a few people whose blogs I check almost daily and who really inspire me.
Alexandra
Corie
Barb
Jules
Check out their fabulous blogs as well!
I'm going to nominate a few people whose blogs I check almost daily and who really inspire me.
Alexandra
Corie
Barb
Jules
Check out their fabulous blogs as well!
Thursday, September 27, 2007
What Scrapbooking Item Are You?
Jules at Stamping Stuff had this cute quiz posted on her site. Let me know what you are!
What scrapbooking item are you? |
You are GLUE!You are the adhesive that keeps things together. You go through life helping others. You stick to people and try to keep people together. You like it best when you are surrounded by people and able to help them. But Glue Beware - in your efforts to keep everyone together and with you, you sometimes overlook yourself and find it hard to keep yourself together. Don't neglect personal time in your overwhelming need to socialize and help others. Take this quiz! Quizilla | Join | Make A Quiz | More Quizzes | Grab Code |
Wednesday, September 26, 2007
Candy Cone
I didn't have much time to stamp today, so I thought I'd try this quickie! We were shown how to make this paper cone at our large group downline meeting a few weeks ago, and I've been wanting to try it ever since.
All you do is take a 6 x 6 piece of cardstock or designer series paper. I used the So Saffron Prints dp. Roll it up and adhere the sides together. Voila! Could it be easier? I then put an Always Artichoke band around the cone. To decorate this, I stamped a design with my Baroque Motifs set in So Saffron and Bravo Burgundy, punched it out with my 1 3/8-inch circle punch, layered it on Burgundy and punched the whole thing out with my scallop circle punch.
For the treat inside, I decorated some nuggets with different scraps of designer series paper that I had lying around and put them all in a large cello bag.
I thought this was a really cute idea for a table setting or a little treat for someone.
Tuesday, September 25, 2007
Stamp Club Projects
Stamp Clubs will be meeting again next week already! It seems like we just had our first meeting! Thank you to everyone who gave me such encouragement as I was planning for last month's clubs. I was very nervous since there is such a mix of stamping experience in the clubs, but I think everyone had fun. I had the same challenge again this month, but I'm not as nervous. I have to remember that people joined the clubs because they like to stamp and they want to have fun! I had fun making these, so I hope the ladies in my clubs will enjoy them as well.
This card uses emboss resist technique. I wanted to use some non-traditional Christmas colours for it, so I went with Night of Navy and Pale Plum. The snowflake is from the Frosty set.
They will get to make some matching stationery for this card using the Snowflake Stampin' Around wheel. It's a quick, easy way to decorate your paper for writing your Christmas letters!
This snowman card is a shaker card (a request from a club member!). I had never made a shaker card before, so I had quite a time trying to figure out how to make the frame for the acetate fit the image and still seal properly. It's hard to tell from the photo, but there is an acetate sheet over the snowmen that has some glitter behind it. I thought this Flaky Friends set was perfect for the shaker card, since the glitter kind of looks like snow falling on them.
I went with the more traditional Real Red and Glorious Green for this card and coloured the snowmen with Stampin' Write markers.
For the last project, I wanted something other than a card, so I thought it would be a cute idea to make a little treat bag for Thanksgiving or Halloween (we celebrate Thanksgiving in October here in Canada). I found these cute little pumpkin candies at Wal-Mart, and I put some in the small cello bag that SU! carries. For the topper, I used Pumpkin Pie and Always Artichoke cardstock. The pumpkin (from Give Thanks) is stamped in Pumpkin Pie ink (what else?), then coloured in with Stampin' Write markers. I punched it out with the scallop circle punch and adhered the layers together. Then I attached it to the cello bag with gold brads.
Monday, September 24, 2007
Finally Back to Card-Making!
I had a great, but all too short, visit with my mom this past week. Unfortunately, she left Saturday morning. I did manage to make room in the freezer for all the apple pies, and I can't wait for a special occasion so I can break one out and eat it!
I got a bit of stamping done this weekend, after the LONG task of cleaning my craft area (yes, again!). Now that I know where everything is, it's much easier to get things done!
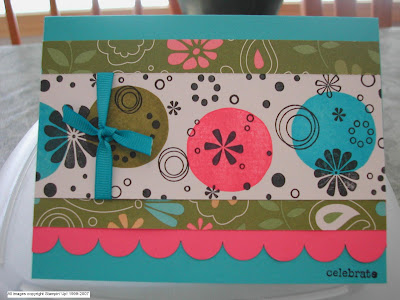
I found this layout & technique in the October issue of Stampin' Success and decided to try it. I've been doing Christmas and Thanksgiving cards for so long now (and it's not even October yet!), that I wanted to do something with some bright, spring colours for a bit of a change. I found my Petals & Paisleys designer paper underneath all my other dp and pulled some out. Very bright and cheerful!
For the main image, I rolled my Petals jumbo wheel over some Whisper White cs with Basic Black ink. Then I stamped the circles in Regal Rose, Tempting Turquoise and Old Olive. The circle is from the retired Shape-Ups, but you could use Dots are Hot in its place. I tied some Turquoise ribbon around it and layered it onto the designer paper. I added a scalloped piece in Regal Rose (scalloped with my slit punch) at the bottom and adhered the whole thing to my Tempting Turquoise card base.
I finished with a sentiment from Everyday Flexible Phrases in Basic Black.
Friday, September 21, 2007
Mom and Apple Pie!
I know I've been MIA for a few days. My mom came to visit this week! It's been so great having her here. The boys love to play with her, and she doesn't get to see them very often. She brought a HUGE box of apples with her from B.C., so we spent this morning making apple pies! Seven of them! (It's not as much work as it sounds - we cheated and used Tenderflake pie crusts!) Now I need to make room in my freezer for all the pies. There is still half a box of apples left, so I guess we'll be eating those for awhile!
I'll have more cards posted next week after her visit. In the meantime, I want to enjoy every minute with my mom before she leaves. Thanks for visiting!
Tuesday, September 18, 2007
Tagged Again!
Have you noticed that there certainly are a lot of different tags going on right now in blogland?! I've been tagged by Alex with this one that I've seen on a lot of blogs. (Check out her fantastic blog and her hilarious answers!) This one's super funny! Here goes:
How about Donna, Rose Ann, Julie, Lori, and Amanda. Feel free to join in as well. Let me know what names you come up with!
Edited to add: I just got a comment from Maria warning that this tag uses information that banks often ask for for security purposes. I hadn't even thought of that, so I've removed some of my responses, and advise people to be careful. Too many people out there that could take advantage of the information, unfortunately.
- ROCK STAR NAME (first pet & current car): Marmalade Uplander (oh, that's bad!)
- GANGSTA NAME (favourite ice cream flavour & favourite cookie): Pralines & Cream White Chocolate Macadamia Nut (now there's a mouthful)
- "FLY" GIRL/GUY NAME (first initial of first name & first three letters of last name): S-MCG (??)
- DETECTIVE NAME (favourite colour & favourite animal): Green Cat
- SOAP OPERA NAME (middle name & city where you were born):
- STAR WARS NAME (first three letters of your last name & first two letters of your first): Mcgsh (wow, no vowels!)
- SUPERHERO NAME (2nd favourite colour & favourite drink, put "the"): The Blue Diet Pepsi
- NASCAR NAME (first names of your grandfathers):
- STRIPPER NAME (name of your favourite perfume/cologne & favourite candy): Happy Toffifee
- WITNESS PROTECTION NAME (mother & father's middle names):
How about Donna, Rose Ann, Julie, Lori, and Amanda. Feel free to join in as well. Let me know what names you come up with!
Edited to add: I just got a comment from Maria warning that this tag uses information that banks often ask for for security purposes. I hadn't even thought of that, so I've removed some of my responses, and advise people to be careful. Too many people out there that could take advantage of the information, unfortunately.
Another Great Mail Day!
Imagine how excited I was when I received not one, but TWO envelopes of goodies in the mail today! I won some blog candy from a couple of wonderful ladies and everything arrived on the same day. This is a great week for fun mail!
This is what I received from Alex (California Stampin'):
How cool is this? Some cards and envelopes, stamps, flowers, ribbon, a punch, flower brad, clear stamps and little gem accent stickers. Wow!
This came from Julie (Stamped in His Image):
These are some beautiful clear wedding stamps! I actually don't have any wedding stamps, so this is a great addition to my collection.
Thank you so much Alex and Julie for your generosity. I'm excited to play with these new goodies!
Please make sure you check out both ladies' blogs! They are both so talented, you won't want to miss their beautiful creations.
BTW, Alex will be offering some blog candy again soon for 5000 hits, so be sure to watch for that!
Monday, September 17, 2007
Four Tidbits
I've been tagged by Corie! This looks like a fun one. I'm supposed to share four things about myself for each category, then choose four more people to tag. Here goes:
Four Places I Have Worked:
Four Places I Have Been on Vacation:
Four Places I Would Rather Be Right Now:
Four Places I Have Worked:
- High Park School
- Telus (back when it was AGT - Alberta Government Telephones)
- Superstore bakery (most boring job ever!)
- Cinnamon City Bakery Cafe (yummiest place ever!)
- Spruce Grove, Alberta
- Drayton Valley, Alberta
- Edmonton, Alberta
- Victoria, British Columbia
Four Places I Have Been on Vacation:
- Aruba
- Kauai
- Jamaica
- Jasper
- Pizza
- Lasagna
- Chocolate
- Nachos
Four Places I Would Rather Be Right Now:
- Aruba
- Hawaii (would love to go back to Kauai)
- At a spa being pampered
- Stamping in my basement (sad, but true!)
Look What Came in the Mail Today!
Look what Corie (Creations by Corie) sent me! It's a CD of card ideas that her friend, Teri, (Big Ideas from a Little Girl) came up with, along with a beautiful hand-made card! You can check out the details on the CD here. I so appreciate this, Corie! You went way above and beyond - thank you so much! I love this card, too! It was on Corie's blog, and I just love the smile flower! Too cute! And thank you, Teri, for sharing with me too!
Sunday, September 16, 2007
Christmas Favourites
As promised, here are a few of my favourites from my Christmas board. The cards are in clear envelopes, so hopefully you can still see them alright!
For this card, I used my Autumn card as inspiration, just changing it to a Christmas card.
I again used Artichoke as the base with Wintergreen paper (I really need to order some different Christmas paper!). I used toilet paper technique on Soft Sky cs with Artichoke ink, then punched three holes using my 1 1/4 inch circle punch. I layered this on the designer paper. I then stamped the snowflake from All Through the Year in Soft Sky and punched it out with the 1 1/4 punch. I adhered these to the card with dimensionals. Finally, I stamped "Merry Christmas" from Holidays and Wishes in Artichoke on Whisper White and stuck it to the card with a clip from Pewter Hodgepodge Hardware that has some Blue Bayou ribbon tied around it (I would have used Soft Sky, but I don't have that colour ribbon!).
This card was inspired by this card in the Holiday Mini Catalogue. I used the Wintergreen designer paper with Always Artichoke as my card base. I used a chipboard star from On Board Accents and dyed it with Always Artichoke ink. I stamped the snowflake from Perfect Presentation in Artichoke and punched it out with the 3/4 inch circle punch. Then I matted it on Soft Sky cs and punched that out with my 1 1/4 inch punch. To finish it off, I stamped "Happy Holidays" from Flaky Friends in Artichoke and tied some gold elastic cord around it.
I don't use chipboard very often, but I think I'm going to start. I like the dimension it adds to the card. Besides, I bought a whole bunch of it, and I'm hording it! Is it just me, or does anyone else buy something and not use it because you're waiting for just the right project to use it with! Time to stop that madness! LOL!
For this last card, I used polished stone technique for the background. I used Bravo Burgundy, Always Artichoke and Gold re-inkers for this one. I stamped the Christmas tree and snowflake from Perfect Presentation in black Staz-On. I then tied some black grosgrain ribbon around it, adhered it to some Basic Black cs and stuck the whole thing onto the Bravo Burgundy card base. Quick and simple, but I love the polished stone look! I'm thinking that maybe I will use the tree from Wondrous Gift next time, though, as it will fill the space better.
Anyway, these are three of my favourites, and they didn't take long (as I mentioned yesterday, I only had an hour and a half to make ten cards!). Thanks for looking!
Saturday, September 15, 2007
Tons of Christmas Cards!
I've been quite busy the past few days. Our Stampin' Up! group has a yearly convention, which was today! It was a blast. It's so great to be in this particular downline! My upline (about four above me), Christy, organizes this event for her downline (we actually have bi-monthly meetings, but today was the BIG event). There were about 180 people there, with a guest speaker from the States, Margo Kelli. She was fantastic. We have make & takes, Workshop Wow demonstrations, technique demonstrations, awards for promotions, displays of hundreds of cards and projects to give us ideas. It really is a fantastic opportunity to learn and grow as a demonstrator.
So, my task was to prepare a Christmas card display board, and of course, I was ten cards short yesterday! So I spent the hour and a half that my kids were napping trying to whip up ten Christmas cards. I have to admit that I CASEd most of them from SCS and the SU! demo website (I wouldn't have been able to come up with ten original cards in an hour!).
Here's a photo of the finished display board:
Tomorrow I'll post a couple of my favourites that are on the board so you can see them close-up. You should be able to click on the photo as well to see an enlarged version.
Tomorrow my mother-in-law is having a new catalogue open house (she's been busy all summer fundraising for the Weekend to End Breast Cancer, so this is the first opportunity she's had to hold her open house!). She's also in my downline! So I'll be there tomorrow to lend some moral support! It should be lots of fun! She always comes up with fun cards to make.
Thanks for stopping by!
Thursday, September 13, 2007
Wondrous Gift in Pastels
This is one of the cards I demonstrated at my workshop yesterday. I love the Wondrous Gift stamp set - it's the set I bought to make my own Christmas cards with this year!
I wanted to showcase the Stampin' Pastels as well, which work perfectly with this set.
I stamped the tree in VersaMark on Whisper White cs, then used my sponge daubers to dab Mellow Moss and Brocade Blue pastels over the ink. I adhered this piece to a Brocade Blue matte, then put a clip from my pewter Hodgepodge hardware in the top left corner. I tied Mellow Moss and Brocade Blue ribbon around the clip.
The card base is Bashful Blue. I stamped the snowflake in the same colour ink to make the background. After I adhered the tree to the top of the card, I stamped the greeting in Brocade Blue at the bottom of the card. Since I just received my Rich Regals brads this week, I had to add some! I haven't ordered coloured brads before - and I LOVE them! They are so pretty. You'll be seeing lots of them on upcoming cards!
So there's my simple Christmas card. Hope you enjoy!
Wednesday, September 12, 2007
Thanks!
Thank you all for your encouraging comments. My stamp clubs went very well. I think everyone had fun. I had clubs on Monday and Tuesday nights, so I've been busy! Both groups have such nice ladies, we're going to have a blast this year! Then this afternoon I had a workshop at a customer's home - which was so much fun. What a great job I have! So needless to say, I haven't had much time to get any blogging or blurfing done. Hopefully I'll get some time tomorrow night to play with my stamps and get something posted. I also need to cruise around and see what everyone else in blogland is up to! In the meantime, thanks for visiting, and I hope to see you soon!
Monday, September 10, 2007
Double Slider Card
Corie posted a tutorial for the double slider card awhile ago, and I've been dying to try it. I finally got a chance yesterday, so here's what I came up with.
I started with this designer paper that I bought at our local scrapbook store, Scrapbook Oasis. I can't remember who makes it, sorry. The colours in it matched perfectly with Wild Wasabi, Chocolate Chip and Blue Bayou, so I went with those.
I wanted it to be a thank you card, so I used numerous stamps with that sentiment, including Sincere Salutations, Much Appreciated and Simply Said. The rose is from the Wild Rose set.
This will probably be a stamp club card at some point in the future! It took quite a bit of fiddling to make sure everything lined up, but once I figured it out, things went smoothly!
So my first stamp club of the year meets tonight. I'm very nervous and excited! I need to go clean my house so it's presentable! Thanks for reading!
Sunday, September 9, 2007
Evening Sky
Saturday, September 8, 2007
Criss Cross Card
Beate posted a tutorial this week on Splitcoast Stampers for this awesome Criss Cross Card! I decided to get out some bright, fun colours for this one (no more monochromatic!).
I used my Flowers for You designer paper with Certainly Celery, Lovely Lilac, Pixie Pink, and Tempting Turquoise for accents. I love the Priceless set for a fun, whimsical look, so I went with that. For the band across the front, I cut out three stamped flowers. It needed something with them, and my friend Treena recently showed me how to shred grosgrain ribbon to make this feathery look. You just cut the long edges off that hold the ribbon together, then pull the strands apart. I took shreds of turquoise, pink and celery ribbon and put them under the flowers.
For the rest of the card, Beate's tutorial pretty much speaks for itself, so you can check that out for step-by-step instructions.
Beate's Weekend Sketch Challenge #18
I just love Beate's sketch challenges! I don't often just make a card for no reason, but her challenges give me an excuse to play! Here's my card for this weekend's challenge.
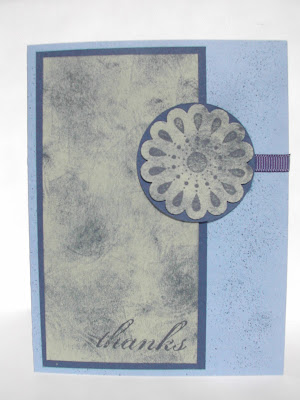
Again, I went monochromatic! One day I'll deviate, but for now I prefer this look! The card base is Brocade Blue. I used my color spritzer to spray Night of Navy ink all over it. Then I used TP technique again (I love this look!) with Night of Navy ink on Mellow Moss cs. The big spiral stamp is from In the Spotlight, stamped again in Night of Navy on TP'd Mellow Moss. I punched it out with the scallop circle punch, then matted it on navy cs (cut out with my Creative Memories cutter kit). I used navy grosgrain as an embellishment and stamped the "thanks" from Much Appreciated in navy at the bottom.
I didn't want to add anything over the Mellow Moss panel to cover up the texture, so I think the card unintentionally turned out quite masculine, which is great because I always struggle with masculine cards.
Friday, September 7, 2007
Christmas Planner
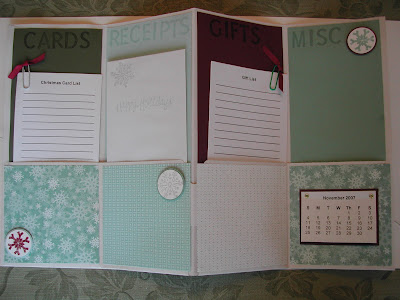
I found these awesome planners on Deb's blog. I saw hers and had to make one! There are also a few on Splitcoast Stampers that are great too. For this particular one, I CASEd the pocket titles and lists from Traci.
You just start with one of those school pocket folders (I found mine at Superstore for 20 cents each!). Then I scored each side in half (4 1/2" on this one). Then just fold it so the middle is a peak (reverse the fold it already has).
I decorated with Wintergreen designer paper with Bravo Burgundy, Always Artichoke, Sage Shadow and Soft Sky to coordinate. For the front, I printed "Christmas Planner" off on my computer, then cut it to size, stamped on it and matted it with Burgundy. I tied the silver elastic cord around the folder before I adhered the designer paper on the front, so it will stay on.
For the inside pockets, I cut strips of cardstock to 4 1/2" for the middle ones and 4 1/4" for the outsideones. I stamped on them, then adhered them into the pockets. The bottom parts of the pockets are 4 1/2" squares of designer paper.
Then I made little lists on my computer for cards and for gifts and printed off five copies. I trimmed them to fit the pockets and held them together with paper clips tied with some grosgrain ribbon. In the "Receipts" pocket, I stamped on a regular-sized envelope and put that in. At the bottom of the Miscellaneous pocket is a calendar for November and December, held together with eyelets.
This is going to be the gift for my hostesses who hold workshops this fall.
Steppin' Out!
Check out this adorable shoe card that my friend, Treena made! It's so cute! She made a Halloween one as well and put gummy tarantulas in it!
Thursday, September 6, 2007
Stamp Club Cards
I'm finally back online and have had a chance to do some stamping! I've been preparing for my new Stamp Clubs which start next week. I thought it would be appropriate to do some Fall-themed cards since it's already September. I've been focusing so much on Christmas, that I neglected my Autumn/Thanksgiving cards! Oops!
The challenge this time around is that I've got ladies in the clubs who are seasoned pros at stamping along with some newbies. So I've got to come up with some projects that are not too complicated for beginners, but interesting enough for the more advanced ladies. I hope I've succeeded with these cards. I got some inspiration from the Stampin' Up! demonstrator site for the Autumn card and the Pumpkin card.
Leslie posted a notebook a few days ago that she had decorated using TP (toilet paper) technique, and I thought it looked amazing, so I added that to this Autumn card that I found on the demo site. I love how it makes the cardstock look like leather (at least it does in person!). I used Close to Cocoa ink on Really Rust cs. The base of the card is River Rock, and I used the Apple Cider designer paper. The acorns are from the All Through the Year set, and the "Autumn" is from Season by Season. I punched the holes with the 1 1/4-inch circle punch, and the acorns are adhered with dimensionals.
I found this square card on the demo site as well. I wouldn't normally use this kind of background, but I think it gives the card a funky feel! It's glossy white cardstock that I just rubbed the ink pads all over! I like the quick and simple approach! This card has Wild Wasabi, Pumpkin Pie and Close to Cocoa. The pumpkin is from the Give Thanks set, coloured in with blender pens in ink.
I can't remember what this type of card is called. If anyone knows, please let me know! The "bookmark" pops out of a slit in the base of the card, so when it's folded up you can't see the sunflower portion of the card. The base of the card is Not Quite Navy, and the bookmark part is Naturals Ivory. The sunflower is from Give Thanks and is stamped in Basic Brown and coloured in with More Mustard and Old Olive ink using blender pens. It's topped off with a bit of More Mustard grosgrain ribbon.
Blog Candy Winner!
I so enjoyed reading all your comments and learning where people are from! I am amazed that there are readers from all over the world - Iran, Norway, Australia, Finland, the United States and Canada! Thank you so much for checking out my blog.
And the winner is:
#9! Krisstee - Here is Krisstee's comment:
I love your work and WoW, what great candy. I am in a little place just outside Amherst, NS, Canada. Happy Blogging.
Congratulations, Krisstee! Please email me your snail mail address so I can send your prize to you!By the way, check out Krisstee's blog - it's beautiful! I haven't had a chance to check out all your blogs yet since my internet has been down, but I will get to them. I'm excited to see everyone's work! Thanks again for playing!
Blog Candy for 5000 Hits!
BLOG CANDY ALERT! I'll leave this post at the top until the winner has been drawn, so please scroll down for new posts!
I have been having so much fun blogging this summer, and I am so amazed that people are visiting. I notice that I'm almost at 5000 hits. I really hope you enjoy my blog, and I appreciate the kind comments you leave.
So to thank you for visiting, I am offering up some blog candy. What's included? Well, I've got an assortment of crafting goodies here. There are some 6 x 6 sheets of double-sided SU! designer paper, some Accents & Elements sticker sheets, pocket notes with envelopes, two Michael's stamps, a SU! "hand-stamped" stamp, a black Stampin' Spot, some assorted SU! buttons and brads and some card embellishments that came in a card-making kit I got at Costco! I hope that sounds enticing!
So what do you need to do to win this? I saw this idea on someone else's blog (I'm afraid I can't remember which one), and I thought it was great. I think it's so cool that stampers and scrappers all over the world are connected by blogging, so all you need to do is leave a comment on this post and tell me where you're from (you don't need to leave a city name if you don't want to - just a province/state or country). Also, please make sure I have a way to contact you if you win.
I'll leave this open until Wednesday night, and I'll use Random.org to choose a winner on Thursday morning.
Wednesday, September 5, 2007
Internet Withdrawal!
AAAH! My internet has been down for the past two days, so I haven't been able to get online to see anything or post anything! I'm getting the shakes from withdrawal! LOL!
I actually haven't had a chance to do much stamping anyway, so no new photos today. I'll have something tomorrow, though. Plus, I'll draw a winner for the blog candy in the morning, so check back here tomorrow afternoon to see if you've won!
Thanks to all of you who have left comments for the candy and for other posts. When I got online tonight, I couldn't believe the number of comments!
Thanks for reading, and I'll see you tomorrow.
Saturday, September 1, 2007
Acrylic Post-Its Holder
One of my downline, Kristine, showed me this cute idea for post-its (I know it's on Splitcoast as well, but it's new to me!).
It's just an acrylic 4 x 6 frame that I found at the dollar store.
For the main part, I cut a piece of Wild Wasabi cs to 4 x 6 so it would fit in the frame. Then I used the Apple Cider designer paper for the background. I stamped the sunflower from Give Thanks in Basic Brown, then coloured it in using blender pens with More Mustard, Wild Wasabi and Close to Cocoa ink. The little flowers are stamped from the In the Spotlight hostess set in Wasabi, Pumpkin Pie and Mustard, then punched out with the 3/4-inch circle punch.
Then I slid the page into the frame and adhered the post-its to the outside. I just peeled off the back page and stuck the last post-it onto the frame. That way, it's re-usable when you run out of post-its!
For the pen, I just cut a piece of designer paper 3 1/4 x 1 1/4 inches, rolled it up and slid it inside an RSVP pen. Quick and simple!
Beate's Weekend Sketch Challenge #17
Here is my card for Beate's challenge. As luck would have it, it also qualifies for Barb's Bingo Challenge (use In Colors and use punches).
I used the Soft Sky textured cardstock as the card base. It is a 5 x 5 square card. For the circle, I used Wintergreen designer paper. I cut it out and mounted it on Blue Bayou. I used my Creative Memories cutter to cut the circles (ssh! - it's not SU!) Then I embossed the flourished from Priceless with white embossing powder onto the circles. I cut part of the circle off afterward so it fit on the card.
The butterfly is also from Priceless. I stamped it in VersaMark and embossed it with white embossing powder as well. Then I punched it out with my new SU! scallop punch. The sentiment is from the Garden Silhouettes hostess set, also embossed with white EP on Blue Bayou cardstock. I punched it out with my small oval punch and put it in a pewter hodgepodge hardware piece, set with brads onto the strip of Wintergreen paper. I put the Blue Bayou ribbon onto the Wintergreen paper as well before adhering the whole thing to the card base. Then I attached the circle and the butterfly afterwards.
I know it's monochromatic again, but I love the look of one colour family together, and I love the Soft Sky/Blue Bayou combo!
Subscribe to:
Posts (Atom)