Monday, January 25, 2010

January Scrapbook Club Layout

I'm very excited to be having Scrapbook Club again tonight after taking a break over Christmas.  It's been almost two months since we've met as a group, so it will be nice to see everyone again after the holiday. 


As promised, we'll be doing a layout featuring the new Sweet Pea designer series paper and the matching Sweet Pea Stitched Felt pieces.  I saw a similar layout in a magazine, and thought this paper would be perfect for a "patchwork"-type layout since there's so much paper in the package!

I used Taken with Teal as the base for the layout, but I also have Rose Red and So Saffron available for the ladies to choose from in case they want to make it more girlie or neutral!  I used Chocolate Chip as an accent colour, with photo mats, 5/8" grosgrain ribbon and a piece that is punched with the new Sale-A-Bration Scallop Trim Border punch (can you believe you can get it for free?!).

Thank you for stopping by today!  I have an all-day scrap coming up next weekend at my church that I'm very excited about, so I should have lots of things to post for you in the coming month - as long as I can stop visiting and eating long enough to get some crafting done!

Blessings to you,

Friday, January 15, 2010

A Little Birdie...


I got to play with some of my new Occasions Mini Catalogue stuff a few weeks ago, and I'm finally getting a chance to post this!

This card uses the new Bird and a Branch punch (love the new punch style!).  I punched the bird with Not Quite Navy Patterns designer paper and the branches with Mellow Moss Patterns designer paper.  It's a pretty simple card!  Again, it's amazing how easy it is to make a card with some designer paper and punches!  I finished it off with some Night of Navy ribbon.

Thanks for stopping by!


Monday, January 11, 2010

My Christmas Card (A Little Late!)


This is another one of the cards I made for Christmas this year (and mailed out well after New Years!).  I decided to go much simpler this year with my cards since I had to make close to 200 this year.  Last year I had embossing on my card, and it took forever to finish them all!  

I used the Holy Family stamp set with Soft Suede ink to match the Christmas Cocoa designer series paper.  I sponged Champagne Shimmer Paint over the stamped image.

Thanks for stopping by today!

Blessings to you,

Sunday, January 10, 2010

My MDS Christmas Card


This is one of the Christmas cards I made this year to send out.  I used My Digital Studio to create the card.  I LOVE this digital program.  Wow!  Is it ever easy to design and create cards, layouts, calendars and multimedia projects.  You can move things around, change colours, add and remove elements, all without wasting any paper or embellishments! 

After I designed the card, which uses the digital version of Christmas Cocoa designer series paper and the Delightful Decorations stamp set, I printed it out from my computer on Whisper White cardstock.  I cut it out to 4 x 5 1/4", then wrapped some Real Red grosgrain ribbon around the middle.  I added a gold brad to the center of the ornament, then adhered the whole thing to a Real Red card base.  Super easy!

Blessings to you,

Friday, January 8, 2010

December's Stamp Club Projects (Oops!)

I know I am completely late posting these, and my clubs have already made these cards, but I thought I would post them anyway because I like them!

We made this Spring Card using Christmas Cocoa designer series paper and Dasher stamped in Soft Suede.  We added some sparkle to his antlers with chunky glitter and stamped a little "very merry" from Short & Sweet in Real Red.


This second card uses dazzling diamond dust technique.  I stamped the tree from Snow Swirled in Always Artichoke on Mellow Moss paper, then used my stamp-a-ma-jig to stamp over it again with VersaMark (you could also just stamp it once in craft ink, but I didn't have any!).  Then I embossed it with Iridescent Ice embossing powder.  The mat for the tree piece is Always Artichoke, and I covered the edges with VersaMark and embossed them with Iridescent Ice as well to make it sparkle!  The circle is cut with my Circle Scissors plus (I think it's 5").  Then I wrapped some silver elastic cord and added a little snowflake circle (3/4" layered on 1") with some Dazzling Diamonds glitter in the middle.
This final card uses the Tree Trimmings set.  I almost missed this set in the catalogue because it is on the Christmas Collection page!  But once I found it, I had to have it!  I think it's so cute!  We stamped two ornaments in Old Olive on the Very Vanilla piece (with ticket corners punched out).  The main ornament is stamped in Bravo Burgundy from the Delightful Decorations stamp set and punched with the ornament punch.  We added a rhinestone brad through the center, along with some gold elastic cord.  The sentiment is from Teeny Tiny Wishes, punched with the Word Window punched and layered on a Bravo Burgundy Modern Label punched piece.
I think the ladies liked them!  I'll try to stay more up-to-date with my posts from now on (but no promises!).

Blessings to you,

Tuesday, January 5, 2010

Sweet Pea


I absolutely LOVE this Sweet Pea designer series paper (and you get so much in a pack!  48 sheets!)  It is so bright and fun, and it goes perfectly with the Sweet Pea Stitched Felt pieces.  I am planning on using this paper and these felt pieces in my Scrapbook Club this month, so stay tuned for a layout featuring them!

For this card, I used Rose Red as the card base, paired with Pretty in Pink as a mat.  I added the Sweet Pea dsp and did some faux stitching using my mat pack, paper piercer and a Rose Red Stampin' Write marker.

After that, I just added the Sweet Pea stitched felt pieces with some mini glue dots and stamped a little sentiment using Teeny Tiny Wishes

And voila!  Quick and easy!

Thanks for stopping by!

Blessings to you,

Sunday, January 3, 2010

January Big Shot Club Projects

My Big Shot Club is meeting tonight, and here are the projects we'll be making.


I received one of these adorable Top Note purses last year as a gift from Susan Paterson at a stamping retreat hosted by my upline, and I've been dying to make it with a group!  This is the perfect opportunity as the group is only six people, so we'll have the time and supplies to make it feasible!  I am totally CASEing Susan with this one!  There is also a great tutorial here.

For this purse, I used the faux alligator skin technique on Whisper White paper to make it look like an alligator skin purse.  To do this, you cut the Top Note on the Big Shot, cover it with VersaMark ink and pour clear embossing powder over the whole piece.  Then use a bone folder to make squiggly lines horizontally and vertically through the powder before you heat set it.  After the lines are in, heat set it and you'll have a great faux alligator look.  I did this on three top notes pieces to make the purse.  It's finished off with some Soft Suede polka dot ribbon, a Pretties flower and a Chocolate Chip corduroy button.


The second project is a quicky because the purse will take a bit of time.  We're going to make fridge magnets!  I found some magnetic sheets at a craft store and cut them into smaller pieces (about 3 x 3 1/2").  I then cut some Kaleidoscope designer series paper the same size and adhered it to the magnet.  Then I ran the piece through my Big Shot with the Beautiful Butterflies die.  Finally, to embellish, I added a smaller butterfly piece of Kaleidoscope paper.  I put some silver elastic cord "antennae" on the back with a dimensional and used that to adhere it to the big butterfly.  To finish, I added some silver microbeads using Tombow Multipurpose adhesive.  I'm sorry the photo didn't turn out very well - hopefully you get the gist of it!

Here's a side view of the purse:

Thanks for stopping by!

Blessings to you,

Saturday, January 2, 2010

January Stamp Club Projects

Happy New Year Everyone!

It has been a long time since I've had a chance to do some stamping or posting.  It's been a crazy few months.  We put our house up for sale last June and have been busy cleaning and hoping for it to sell.  It hasn't sold, but we've decided to start building our new house anyway, so now it's been a whirlwind of deciding what flooring, lighting, paint, cabinetry, etc. we want in the new house, along with school, workshops, stamp clubs, church, Awana, Bible study, and all those other activities, I've barely had time to think, let alone stamp!  Maybe if I didn't spend so much time on Facebook...

So over the Christmas holiday, I at least had one afternoon of stamping.  I've planned my January club projects (ahead of time too!).  They all feature products from the new Occasions Mini Catalogue.  Here's what we're making:


I completely CASEd this card by Michelle Zindorf.  When I saw it on Splitcoast, I knew I had to make it!  What a unique technique.  I've never seen this before, and I know my Stamp Club ladies will love it!  I used Apricot Appeal, More Mustard, Dusty Durango and Real Red Ink, along with the new Vintage Vogue stamp set in Basic Black ink. Michelle gives a wonderful tutorial on this technique, so check out her blog if you want to see how. 

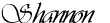
This second card is a matchbook post-its holder based on this tutorial on Splitcoast.  I wanted to make it more Valentine-y so I used the Love Bandit stamp set.  The image is stamped in Basic Black with Melon Mambo sponged around the edges.  I coloured this little guy in with my In Color Stampin' Write markers.

I have not used Melon Mambo very often, so I thought it was time to christen that ink pad and paper package!  I paired it with some Razzleberry Lemonade designer series paper, Basic Black and Black gingham ribbon.  The eyelet border punch makes a great edge at the bottom of the matchbook, and I punched a little slot with the Horizontal Slot punch to tuck in one of the eyelet border pieces so the book stays closed.


This third card is yet another CASE, of this card by Debbie Naylor.  I thought it was just stunning when I saw it on Splitcoast.  I used Pretty in Pink with Rich Razzleberry, along with Rich Razzleberry polka dot ribbon.

I used the Elegant Bouquet Textured Impressions folder with my Big Shot for the top layer, adding some purple Fine Cosmo glitter in the center of the flowers.

The heart stamp is from the I {Heart} Hearts stamp set, punched with the Full Heart punch.  There is a paper clip behind the heart, attached with a dimensional, that I tied the ribbon around.  The sentiment is from Well Scripted, stamped in Razzleberry.

Thanks for stopping by today!  I have more cards made that I'll schedule to post through January so that it looks like I'm blogging more!  Hopefully I'll be able to blog more regularly in the New Year!  One of my resolutions is to spend less time on Facebook and more time on more important things (like blogging!).

Blessings to you,
Shannon